

Christmas tree【Free Pattern】【Video】【Chart PDF】crochet tutorial
- Aug 12, 2025
- 8 min read
Updated: Apr 17
This pattern includes a tutorial video,
and you can scroll down to see the chart!


↓↓↓Here is the PDF file.↓↓↓(You can print it from here)
↑↑↑↑↑↑↑↑↑↑↑↑↑↑↑↑↑↑↑↑↑↑↑↑


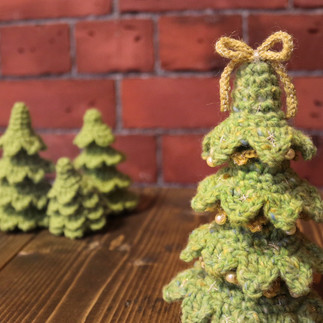
Hello, this is Kaitlin!
This time,
I used three different Nuance yarns from Puppy to crochet this Christmas tree.
The body can be worked all the way through without cutting the yarn,
so there’s minimal end-weaving
and the process goes smoothly from start to finish.
It works up quickly,
making it the perfect little project for a short break.
Display it at your entrance during the holiday season,
and it’s sure to bring a big boost of festive cheer! 🎄✨
Materials:
・1 skein Soft Donegal col.5250 (75m/40g)
or any other worsted to bulky weight yarn
・1 skein British Fine col.35 (116m/25g)
or any other fingering yarn
・1 skein Miroir Perle col.402 (230m/20g)
or any other metallic or glitter yarn
・5.00mm crochet hook
・2.50mm crochet hook
・Tapestry needle
・Tapestry needle for thinner yarn
・ Stitch markers
・ Scissors
・ Measuring tape
・ 12 pearl beads (6 mm, with large holes)
・ Knitting pins (for blocking)
・ Steam iron
Gauge:
12 sts × 14 rows = 10 cm × 10cm ( in single crochet)
Size:
Height: approx. 16 cm Maximum width: approx. 10 cm
Start with a magic ring, and work Round 1 using a size 5.00 mm crochet hook.
Body – Rnd 1
ch 1 as turning chain, 6 sc into the ring, tighten the ring (Video 02:21),
1 sl st to join. (6 sts total)
After working the beginning ch-1 and the slip stitch to join,
pull the yarn snugly to close up the round and tighten the stitches.
(*Note: Do not tighten the starting chain if it is more than 1 chain stitch.)
Body – Rnd 2
ch 1 as turning chain, 6 sc, 1 sl st to join. (6 sts total)
Body – Rnd 3
ch 1 as turning chain, 2 sc, inc (2 sc in the next st) repeat ** once more,
1 sl st to join. (8 sts total)
Body – Rnd 4
ch 1 as turning chain, 8 sc, 1 sl st to join. (8 sts total)
Body – Rnd 5
ch 1 as turning chain, sc 3, inc repeat ** once more, 1 sl st to join. (10 sts total)
After finishing Round 5 of the body, continue on to Leaf A.
Leaf A – Rnd 1
ch 1 as turning chain, 10 sc into the front loops only of the prev rnd,
1 sl st to join. (10 sts total)
Leaf A – Rnd 2
ch 1 as turning chain, sc 4, inc repeat ** once more, 1 sl st to join. (12 sts total)
Leaf A – Rnd 3
*ch 2, 1 dc, picot (ch 2, 1 sl st), 1 dc, ch 2, 2 sl st*
Repeat ** 5 more times, ch 1, 1 sl st (Video 13:10) (6 leaves total)
Once you’ve finished Round 3 of Leaf A,
continue directly on to the next round of the body.
Body – Rnd 6
ch 1 as turning chain, 10 sc into the unused back loops of Round 5. (10 sts total)
Body – Rnd 7
ch 1 as turning chain, 4 sc, inc repeat ** once more, 1 sl st to join. (12 sts total)
Body – Rnd 8
ch 1 as turning chain, 12 sc BLO (into the back loops of the prev rnd),
1 sl st to join. (12 sts total)
Body – Rnd 9
ch 1 as turning chain, 5 sc, inc repeat ** once more, 1 sl st to join. (14 sts total)
After completing Round 9 of the body, continue on to Leaf B.
Leaf B – Rnd 1
ch 1 as turning chain, 14 sc in front loops only of the previous round,
1 sl st to join. (14 sts total)
Leaf B – Rnd 2
ch 1 as turning chain, 6 sc, inc repeat ** once more, 1 sl st to join. (16 sts total)
Leaf B – Rnd 3
*ch 2, 1 dc, picot (ch 2, 1 sl st), 1 dc, ch 2, 2 sl st*
Repeat ** 7 more times, ch 1, 1 sl st (Video 20:33) (8 leaves total)
Once you've finished Round 3 of Leaf B,
continue directly with the body.
Body – Rnd 10
ch 1 as turning chain, 14 sc into the unused back loops of Round 9. (14 sts total)
Body – Rnd 11
ch 1 as turning chain, 6 sc, inc repeat ** once more, 1 sl st to join. (16 sts total)
Body – Rnd 12
ch 1 as turning chain, 16 sc BLO (into the back loops of the prev rnd),
1 sl st to join. (16 sts total)
Body – Rnd 13
ch 1 as turning chain, 7 sc, inc repeat ** once more, 1 sl st to join. (18 sts total)
After completing Round 13 of the body, continue on to Leaf C.
Leaf C – Rnd 1
ch 1 as turning chain, 18 sc in front loops only of the previous round,
1 sl st to join. (18 sts total)
Leaf C – Rnd 2
ch 1 as turning chain, 8 sc, inc repeat ** once more, 1 sl st to join. (20 sts total)
Leaf C – Rnd 3
*ch 2, 1 dc, picot (ch 2, 1 sl st), 1 dc, ch 2, 2 sl st*
Repeat ** 9 more times, ch 1, 1 sl st (Video 27:09) (10 leaves total)
Once you've finished Round 3 of Leaf C,
continue directly with the body.
Body – Rnd 14
ch 1 as turning chain, 18 sc into the unused back loops of Round 13. (18 sts total)
Body – Rnd 15
ch 1 as turning chain, 8 sc, inc repeat ** once more, 1 sl st to join. (20 sts total)
Body – Rnd 16
ch 1 as turning chain, 20 sc BLO (into the back loops of the prev rnd),
1 sl st to join. (20 sts total)
Body – Rnd 17
ch 1 as turning chain, 9 sc, inc repeat ** once more, 1 sl st to join. (22 sts total)
After completing Round 17 of the body, continue on to Leaf D.
Leaf D – Rnd 1
ch 1 as turning chain, 22 sc in front loops only of the previous round,
1 sl st to join. (22 sts total)
Leaf D – Rnd 2
ch 1 as turning chain, 10 sc, inc repeat ** once more, 1 sl st to join. (24 sts total)
Leaf D – Rnd 3
*ch 2, 1 dc, picot (ch 2, 1 sl st), 1 dc, ch 2, 2 sl st*
Repeat ** 11 more times, ch 1, 1 sl st (Video 33:30) (12 leaves total)
Once you've finished Round 3 of Leaf D, continue directly with the body.
Body – Rnd 18
ch 1 as turning chain, 22 sc into the unused back loops of Round 17. (22 sts total)
Body – Rnd 19
ch 1 as turning chain, 10 sc, inc repeat ** once more, 1 sl st to join. (24 sts total)
Body – Rnd 20
ch 1 as turning chain, 24 sc, 1 sl st to join. (24 sts total)
Body – Rnd 21
ch 1 as turning chain, 2 sc, sc2tog repeat ** 5 more times, 1 sl st to join. (18 sts total)
Body – Rnd 22
ch 1 as turning chain, 1 sc, sc2tog repeat ** 5 more times. (12 sts total)
To finish:
After the final sc2tog, leave a yarn tail of approximately 20 cm,
cut the yarn, and pull it through the last stitch to fasten off.
Changing Yarn
When changing yarn,
do so while a single crochet (or double crochet) is still incomplete.
Bring the old yarn over the hook from front to back.
Place the new yarn behind the work, leaving a 15 cm tail.
Yarn over with the new yarn and pull through all 3 loops on the hook at once.
Leave both yarn tails resting on the wrong side of the fabric until you weave them in later.
Weaving in Ends
Thread the yarn tail onto a tapestry needle
and weave it through several stitches on the wrong side of the fabric,
making sure it doesn't show on the front.
Then go back one stitch and weave it through again to secure the end.
Finishing
Stuff the body with fiberfill.
Once fully stuffed,
thread the yarn tail from the last round onto a tapestry needle.
Use a faux chain join to close the round and connect the final stitch to the first.
To do this, insert the needle under both top loops of the first stitch of the final round,
then bring the needle back into the spot where the yarn tail comes out of the last stitch.
This creates a seamless chain-like join.
Next, you will cinch the opening closed.
Insert the needle from back to front through the front loop only of the first stitch of the final round.
Then skip one stitch,
and insert the needle through the front loop of the third stitch.
Repeat this process: skip one,
insert into the front loop of the fifth stitch,
then the seventh, ninth, and eleventh front loops.
After inserting the needle through all the designated stitches,
pull the yarn tightly to cinch the opening closed.
Insert the needle into the center of the cinched area
and bring it out through a discreet spot under one of the leaves.
Reinsert the needle into the same spot,
and pass it through the fiberfill a few times to secure the end.
Then trim the excess yarn.
Decoration
Hold British Fine and Miroir Perle together
and thread them through a fine tapestry needle.
String three large-hole pearl beads onto the yarn.
Begin working the decoration from the top back-loop round of the main body using a 2.50 mm crochet hook.
Use the chain running behind the leaves and the slip stitch at the end of the round as guides. (Video 43:16)
Insert the hook into the first stitch of Round 8 and join the yarn.
Top Decoration (Body - Rnd 8)
*1 sc, ch 3, slide one pearl up and ch 1 (be careful not to let the yarn slack),
ch 3, 1 sc, ch 6, 1 sl st into the stitch 3 sts back (picot), ch 4* Repeat ** 2 more times, 1 sl st to finish.
To fasten off, ch 1, leave a 10 cm tail, cut the yarn,
and pull it through the final chain.
Weave both yarn ends through the back of the fabric
and into the stuffing several times to secure.
Repeat the same steps for the middle and bottom decorations,
threading pearls onto the yarn before beginning.
Middle Decoration (Body - Rnd 12)
Join the yarn to the first stitch,
*1 sc, ch 6, 1 sl st into the stitch 3 sts back (picot), ch 4, 1 sc,ch 3,
slide one pearl up and ch 1, ch 3* Repeat ** 3 more times, 1 sl st to finish.
Finish off the same way as for the top decoration.
Bottom Decoration (Body - Rnd 16)
Join the yarn to the first stitch,
*1 sc, ch 3, slide one pearl up and ch 1, ch 3, 1 sc,
ch 6, 1 sl st into the stitch 3 sts back (picot), ch 4*
Repeat ** 4 more times, 1 sl st to finish.
Finish off the same way as for the top decoration.
Ribbon
Create a thread cord to make a ribbon that will be attached to the top of the tree. (Video 47:43)
Hold British Fine and Miroir Perle together,
and prepare to start chaining with the yarn tail about 60 cm long.
*Wrap the tail yarn over the hook from front to back,
yarn over with the working yarn,
and pull through both loops on the hook.*(Video 48:13)
Repeat ** until the cord is about 20 cm long.
The number of stitches doesn't need to be exact.
Once the cord reaches around 20 cm, ch 1,
leave a 10 cm yarn tail, cut the yarn,
and pull it through the final chain.
Weave in both ends in a zigzag motion through the fabric to secure them discreetly.
Steam the thread cord thoroughly to shape it.
Thread a single strand of Miroir Perle onto a tapestry needle and prepare to sew.
Shape the thread cord into a bow,
and pass the needle through the center several times to hold the shape.
Attach the bow to the top of the body,
positioning it at the front, opposite the chain join area behind the leaves.
Sew around the center of the bow a few more times with Miroir Perle to secure it in place. (Video 50:28)
Then pass the needle through the fiberfill inside the body a few times to secure the yarn tail.
Steam again to finish shaping.
Embroidery
Embroider any design you like, wherever you like. (Video 51:09)
When embroidering, avoid inserting the needle between stitches,
as this may cause the yarn to shift.
Instead, insert the needle through the strands of the crochet stitches.
When moving the thread to a different location or finishing off,
weave the needle through the back of the fabricto prevent it from showing on the front.
Steam Blocking
Hold the iron above the fabric and apply steam
without touching it directly to smooth and shape the stitches.
Note: Be careful not to let the heat reach the pearls.
For a cleaner finish, use blocking pins to pin the piece in place,
adjusting the shape of the leaves and picots as needed.
All done—great work!
Having a handmade tree on hand can be surprisingly useful
when the moment calls for it. ♡
Give it a try with your favorite yarn or even some leftover scraps you’ve been saving.
I share many other knitting and crochet patterns as well,
so please check out my other posts,
plus my YouTube, Instagram, and LINE stickers!
Thank you so much for reading to the end. ☻
st(s) = stitch(es)
sl st = slip stitch
ch = chain
sc = single crochet
dc = double crochetprev = previous
rnd(s) = round(s)
inc = increase
BLO = back loop only
sc2tog = single crochet 2 stitches together
MR = magic ring
crochet tutorial