

Window Pane Tee【Free Pattern】【Video】【Chart PDF】 Knitting tutorial
This pattern includes a tutorial video,
and you can scroll down to see the chart!
↓↓↓Here is the PDF file.↓↓↓(You can print it from here)
↑↑↑↑↑↑↑↑↑↑↑↑↑↑↑↑↑↑↑↑↑↑↑↑

Today I'd like to introduce the knitting pattern for this Window Check Tee.
This time, I adapted my previous Mesh Summer Sweater pattern to create this Window Check Tee.
Because the base fabric is worked in stripes,
there's no need to carry yarn across the back,
making it an easy project to knit.
It's great for layering and can be worn well into autumn.
I hope you'll enjoy knitting it!
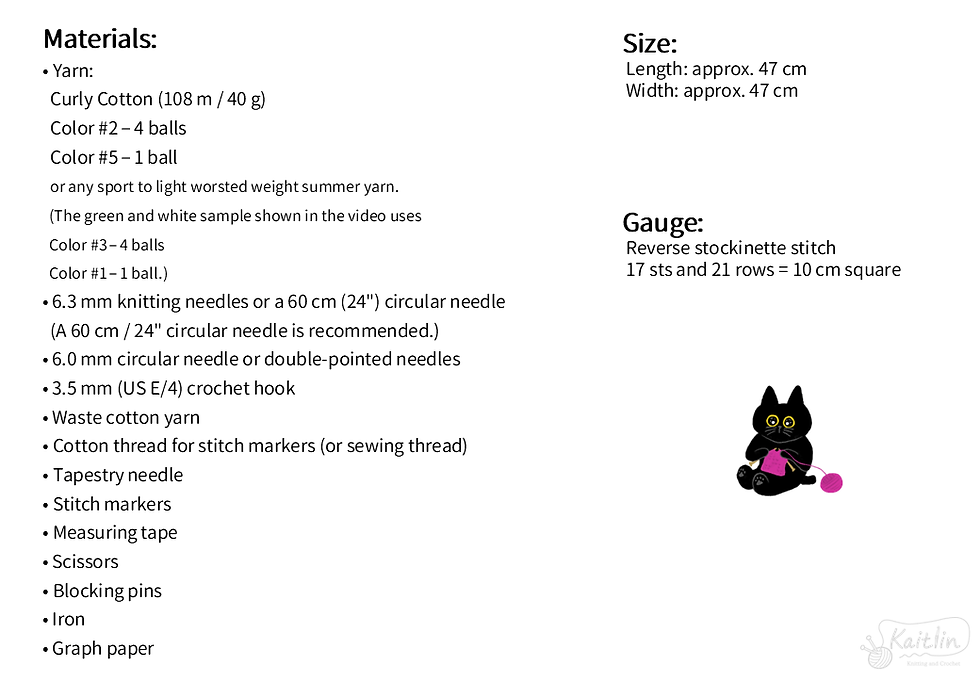
Materials:
• Yarn:
Curly Cotton (108 m / 40 g)
Color #2 – 4 balls
Color #5 – 1 ball
or any sport to light worsted weight summer yarn.
(The green and white sample shown in the video uses
Color #3 – 4 balls
Color #1 – 1 ball.)
• 6.3 mm knitting needles or a 60 cm (24") circular needle
(A 60 cm / 24" circular needle is recommended.)
• 6.0 mm circular needle or double-pointed needles
• 3.5 mm (US E/4) crochet hook
• Waste cotton yarn
• Cotton thread for stitch markers (or sewing thread)
• Tapestry needle
• Stitch markers
• Measuring tape
• Scissors
• Blocking pins
• Iron
• Graph paper
Size:
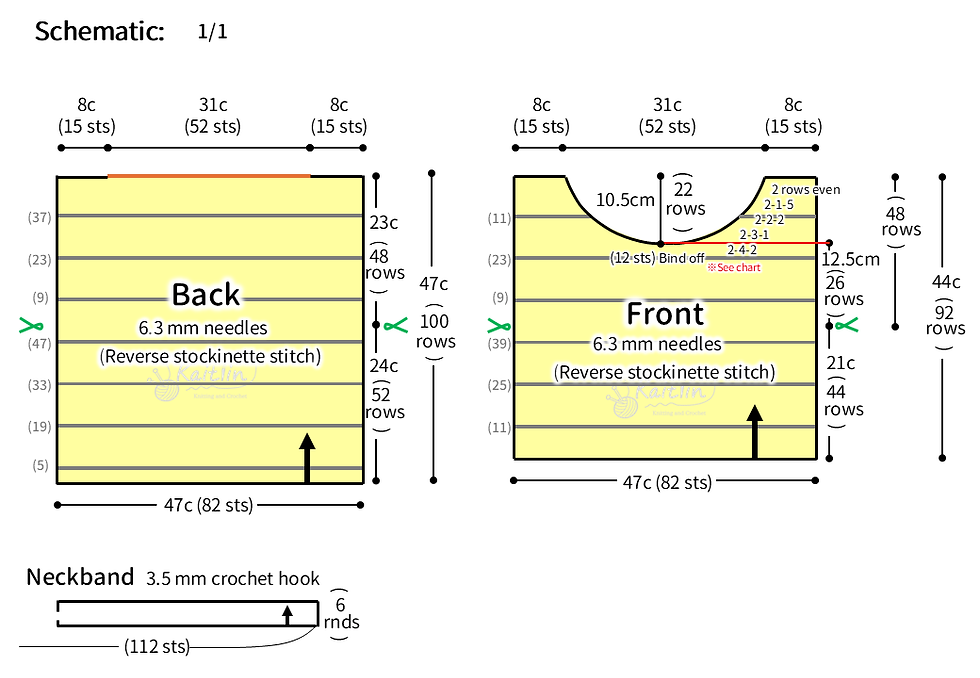
Length: approx. 47 cm
Width: approx. 47 cm
Gauge:
Reverse stockinette stitch
17 sts and 21 rows = 10 cm square
Back
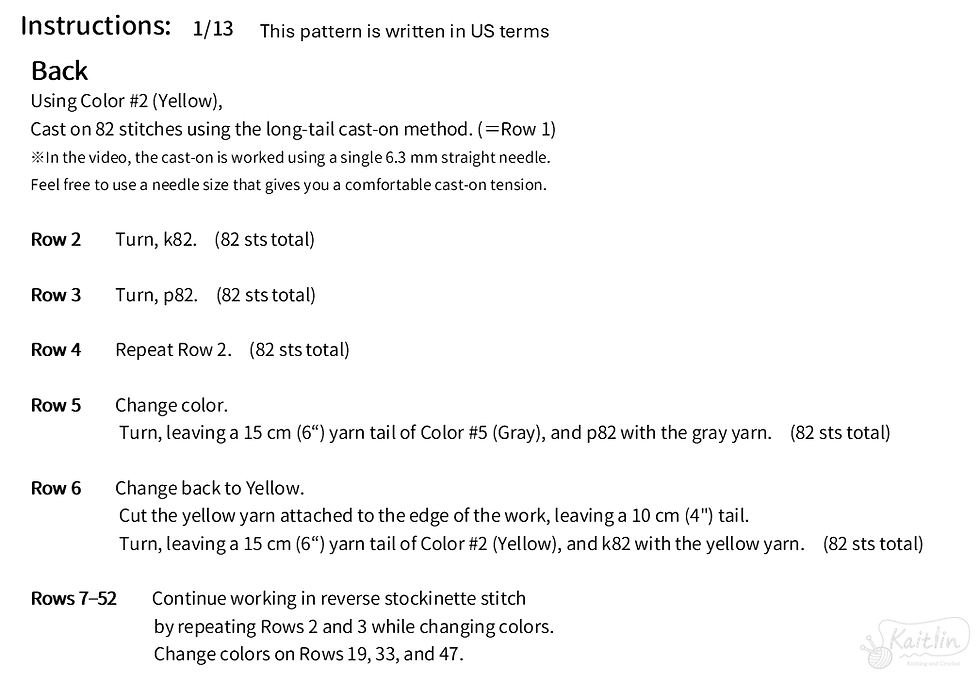
Using Color #2 (Yellow),
Cast on 82 stitches using the long-tail cast-on method. (=Row 1)
※In the video, the cast-on is worked using a single 6.3 mm straight needle.
Feel free to use a needle size that gives you a comfortable cast-on tension.
Row 2
Turn, k82. (82 sts total)
Row 3
Turn, p82. (82 sts total)
Row 4
Repeat Row 2. (82 sts total)
Row 5
Change color.
Turn, leaving a 15 cm (6“) yarn tail of Color #5 (Gray),
and p82 with the gray yarn. (82 sts total)
Row 6
Change back to Yellow.
Cut the yellow yarn attached to the edge of the work, leaving a 10 cm (4") tail.
Turn, leaving a 15 cm (6“) yarn tail of Color #2 (Yellow),
and k82 with the yellow yarn. (82 sts total)
Rows 7–52
Continue working in reverse stockinette stitch
by repeating Rows 2 and 3 while changing colors.
Change colors on Rows 19, 33, and 47.
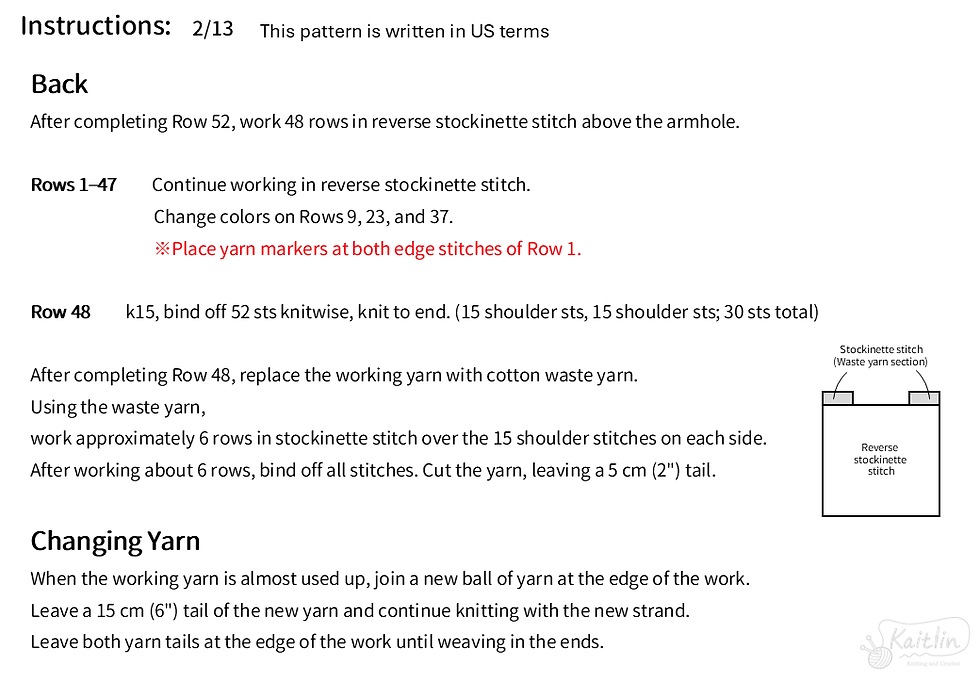
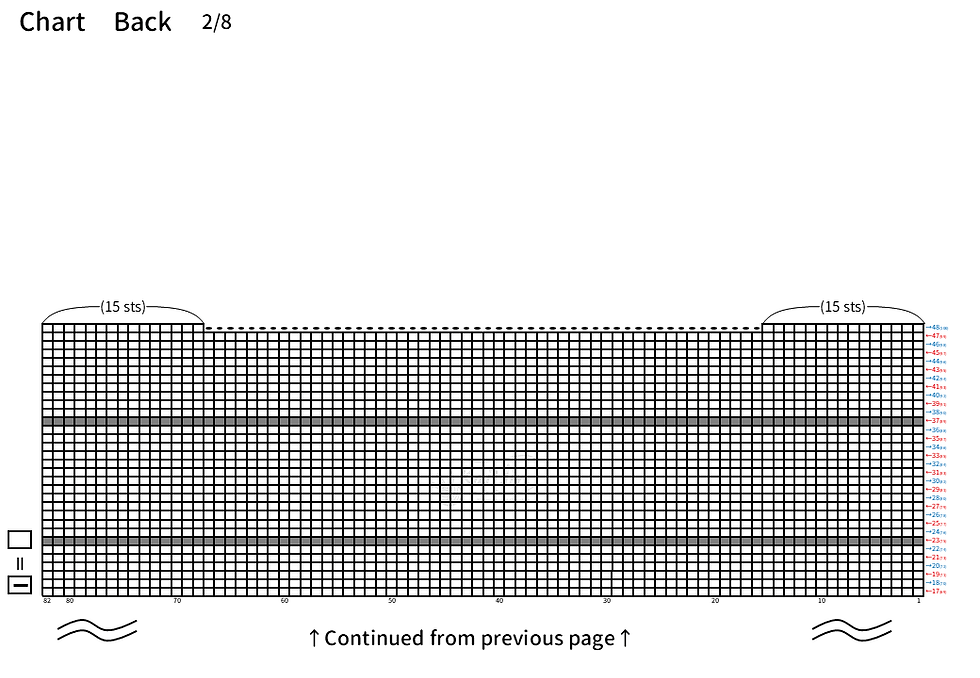
After completing Row 52, work 48 rows in reverse stockinette stitch above the armhole.
Rows 1–47
Continue working in reverse stockinette stitch.
Change colors on Rows 9, 23, and 37.
※Place yarn markers at both edge stitches of Row 1.
Row 48
k15, bind off 52 sts knitwise, knit to end. (15 shoulder sts, 15 shoulder sts; 30 sts total)
After completing Row 48,
replace the working yarn with cotton waste yarn.
Using the waste yarn,
work approximately 6 rows in stockinette stitch over the 15 shoulder stitches on each side.
After working about 6 rows, bind off all stitches.
Cut the yarn, leaving a 5 cm (2") tail.
Changing Yarn
When the working yarn is almost used up,
join a new ball of yarn at the edge of the work.
Leave a 15 cm (6") tail of the new yarn
and continue knitting with the new strand.
Leave both yarn tails at the edge of the work until weaving in the ends.
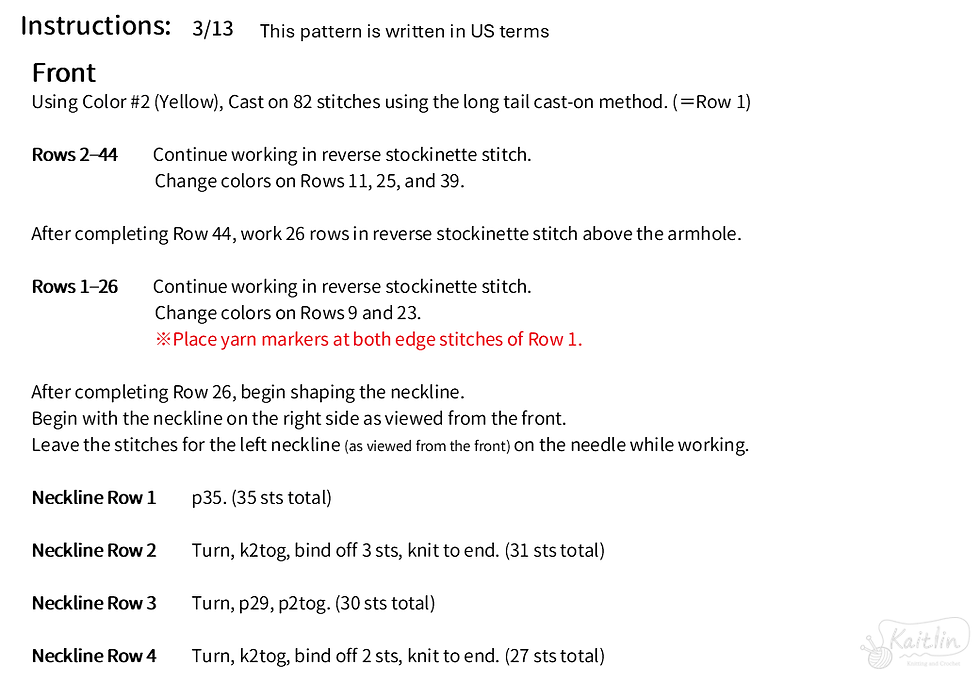
Front
Using Color #2 (Yellow),
Cast on 82 stitches using the long tail cast-on method. (=Row 1)
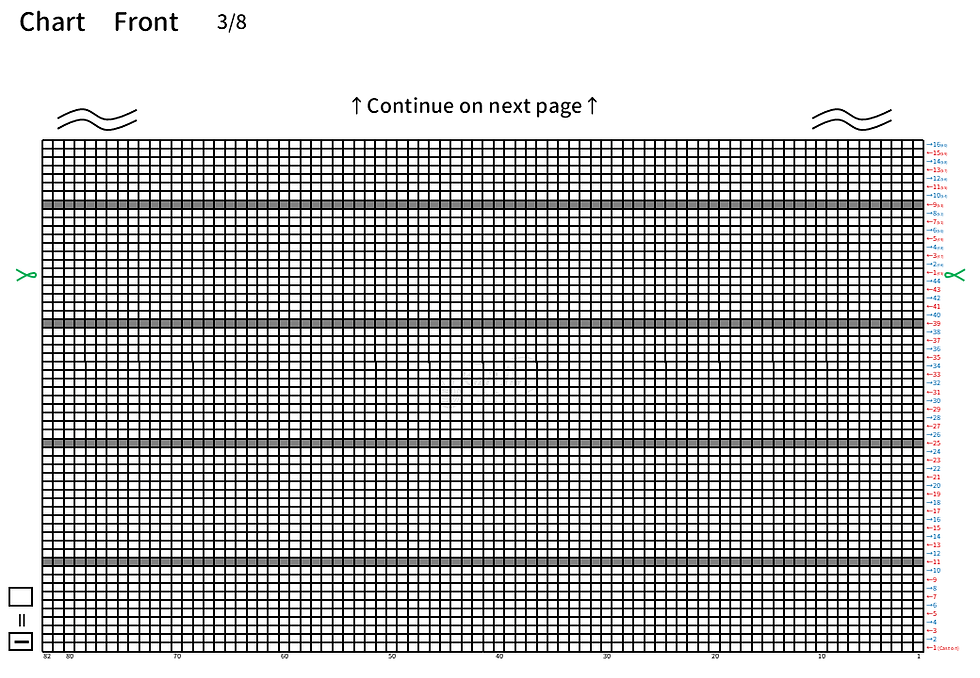
Rows 2–44
Continue working in reverse stockinette stitch.
Change colors on Rows 11, 25, and 39.
After completing Row 44,
work 26 rows in reverse stockinette stitch above the armhole.
Rows 1–26
Continue working in reverse stockinette stitch.
Change colors on Rows 9 and 23.
※Place yarn markers at both edge stitches of Row 1.
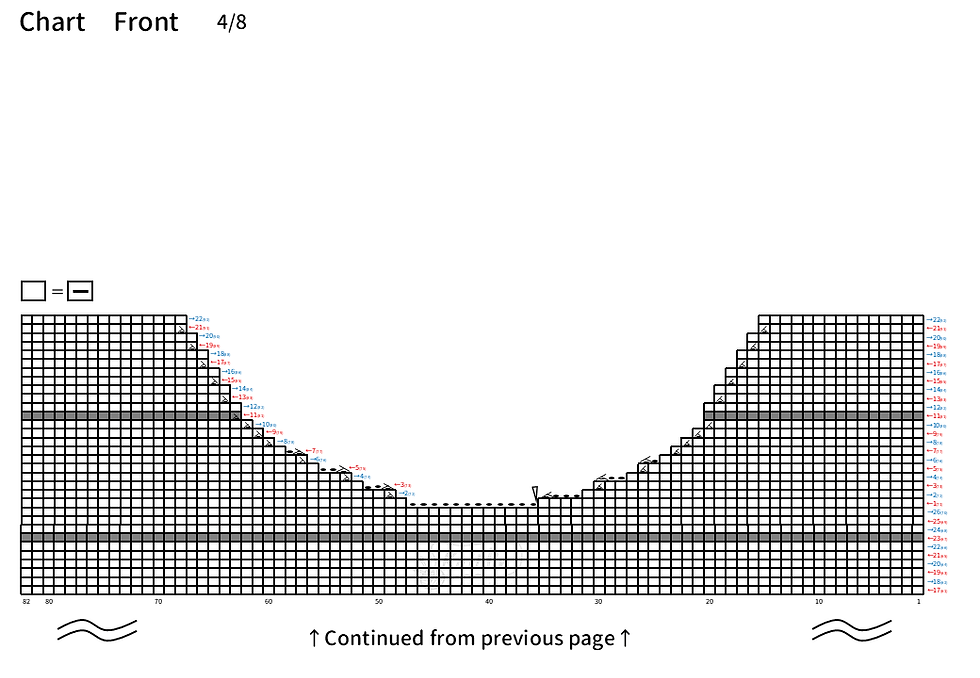
After completing Row 26, begin shaping the neckline.
Begin with the neckline on the right side as viewed from the front.
Leave the stitches for the left neckline (as viewed from the front) on the needle while working.
Neckline Row 1
p35. (35 sts total)
Neckline Row 2
Turn, k2tog, bind off 3 sts, knit to end. (31 sts total)
Neckline Row 3
Turn, p29, p2tog. (30 sts total)
Neckline Row 4
Turn, k2tog, bind off 2 sts, knit to end. (27 sts total)
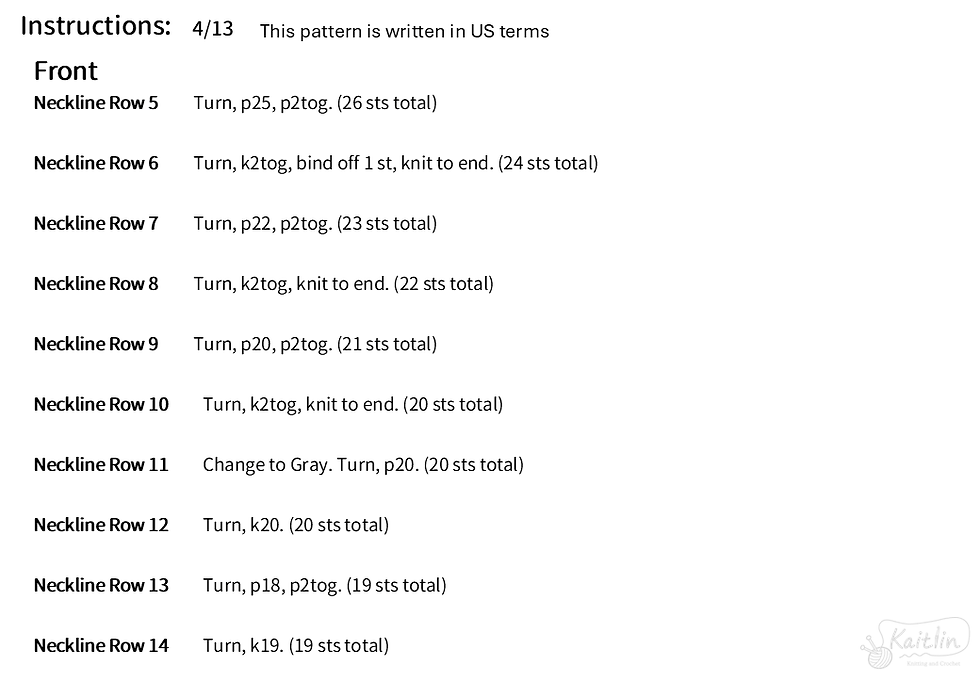
Neckline Row 5
Turn, p25, p2tog. (26 sts total)
Neckline Row 6
Turn, k2tog, bind off 1 st, knit to end. (24 sts total)
Neckline Row 7
Turn, p22, p2tog. (23 sts total)
Neckline Row 8
Turn, k2tog, knit to end. (22 sts total)
Neckline Row 9
Turn, p20, p2tog. (21 sts total)
Neckline Row 10
Turn, k2tog, knit to end. (20 sts total)
Neckline Row 11
Change to Gray. Turn, p20. (20 sts total)
Neckline Row 12
Turn, k20. (20 sts total)
Neckline Row 13
Turn, p18, p2tog. (19 sts total)
Neckline Row 14
Turn, k19. (19 sts total)
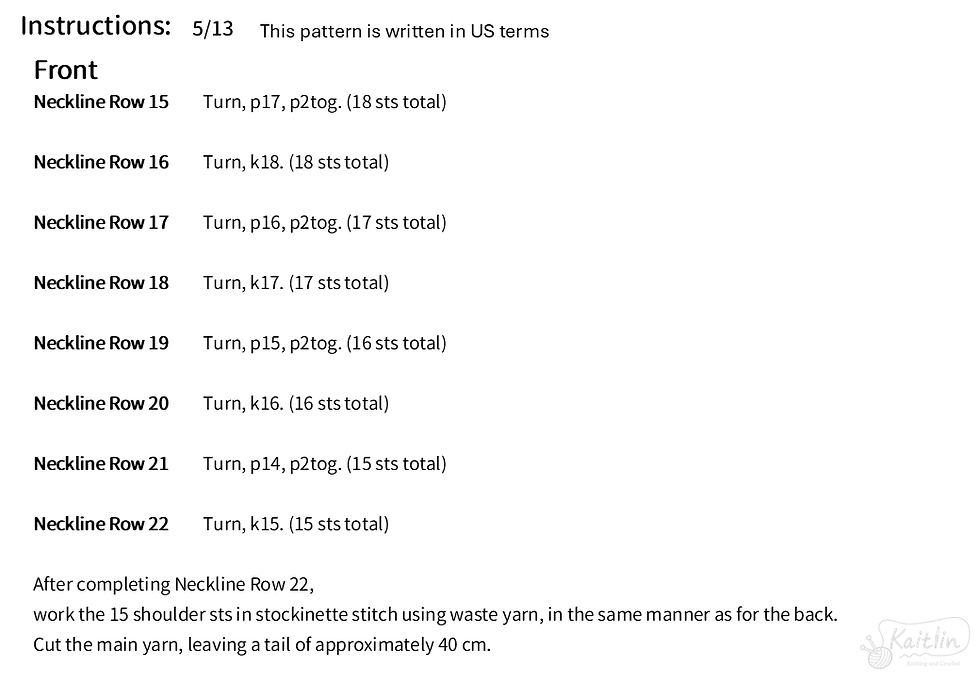
Neckline Row 15
Turn, p17, p2tog. (18 sts total)
Neckline Row 16
Turn, k18. (18 sts total)
Neckline Row 17
Turn, p16, p2tog. (17 sts total)
Neckline Row 18
Turn, k17. (17 sts total)
Neckline Row 19
Turn, p15, p2tog. (16 sts total)
Neckline Row 20
Turn, k16. (16 sts total)
Neckline Row 21
Turn, p14, p2tog. (15 sts total)
Neckline Row 22
Turn, k15. (15 sts total)
After completing Neckline Row 22,
work the 15 shoulder sts in stockinette stitch using waste yarn,
in the same manner as for the back.
Cut the main yarn, leaving a tail of approximately 40 cm.
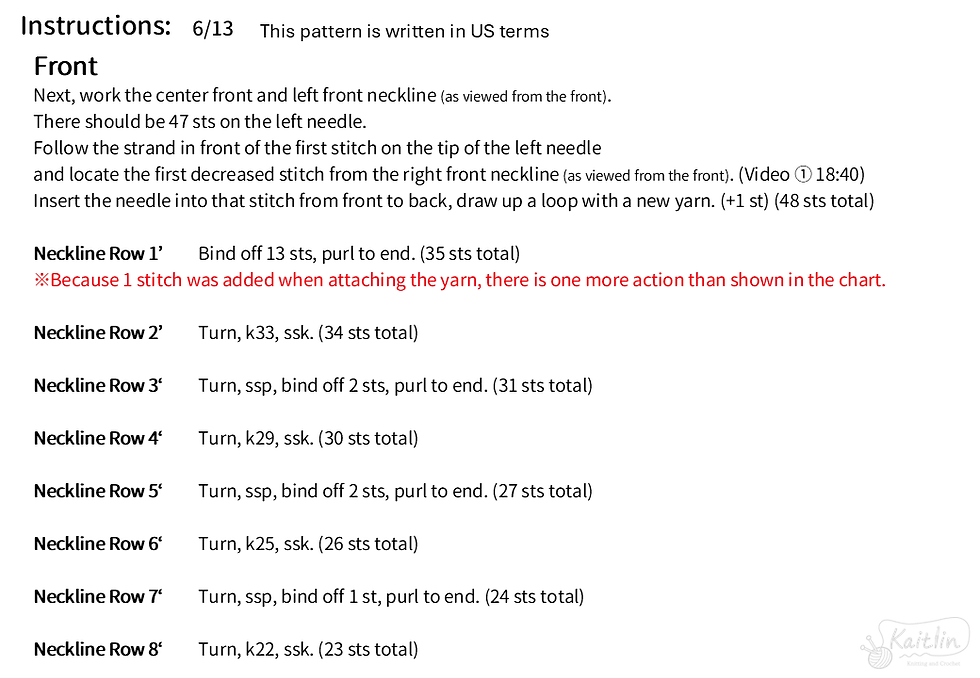
Next, work the center front and left front neckline (as viewed from the front).There should be 47 sts on the left needle.
Follow the strand in front of the first stitch on the tip of the left needle
and locate the first decreased stitch from the right front neckline (as viewed from the front). (Video ① 18:40)
Insert the needle into that stitch from front to back,
draw up a loop with a new yarn. (+1 st) (48 sts total)
Neckline Row 1’
Bind off 13 sts, purl to end. (35 sts total)
※Because 1 stitch was added when attaching the yarn, there is one more action than shown in the chart.
Neckline Row 2’
Turn, k33, ssk. (34 sts total)
Neckline Row 3‘
Turn, ssp, bind off 2 sts, purl to end. (31 sts total)
Neckline Row 4‘
Turn, k29, ssk. (30 sts total)
Neckline Row 5‘
Turn, ssp, bind off 2 sts, purl to end. (27 sts total)
Neckline Row 6‘
Turn, k25, ssk. (26 sts total)
Neckline Row 7‘
Turn, ssp, bind off 1 st, purl to end. (24 sts total)
Neckline Row 8‘
Turn, k22, ssk. (23 sts total)
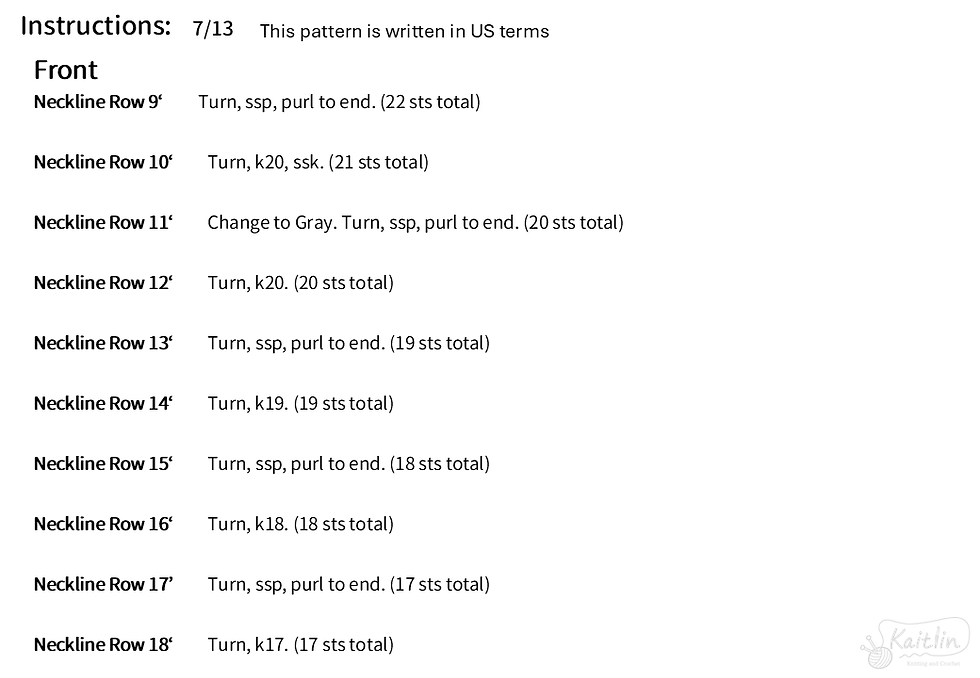
Neckline Row 9‘
Turn, ssp, purl to end. (22 sts total)
Neckline Row 10‘
Turn, k20, ssk. (21 sts total)
Neckline Row 11‘
Change to Gray. Turn, ssp, purl to end. (20 sts total)
Neckline Row 12‘
Turn, k20. (20 sts total)
Neckline Row 13‘
Turn, ssp, purl to end. (19 sts total)
Neckline Row 14‘
Turn, k19. (19 sts total)
Neckline Row 15‘
Turn, ssp, purl to end. (18 sts total)
Neckline Row 16‘
Turn, k18. (18 sts total)
Neckline Row 17’
Turn, ssp, purl to end. (17 sts total)
Neckline Row 18‘
Turn, k17. (17 sts total)
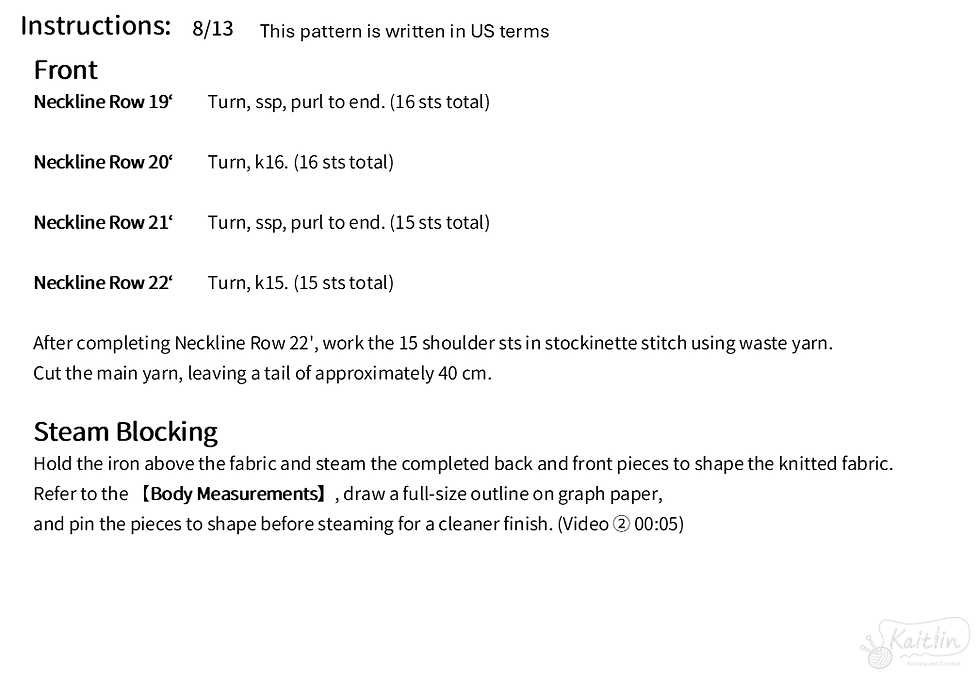
Neckline Row 19‘
Turn, ssp, purl to end. (16 sts total)
Neckline Row 20‘
Turn, k16. (16 sts total)
Neckline Row 21‘
Turn, ssp, purl to end. (15 sts total)
Neckline Row 22‘
Turn, k15. (15 sts total)
After completing Neckline Row 22',
work the 15 shoulder sts in stockinette stitch using waste yarn.
Cut the main yarn, leaving a tail of approximately 40 cm.
Steam Blocking
Hold the iron above the fabric and steam the completed back and front pieces to shape the knitted fabric.
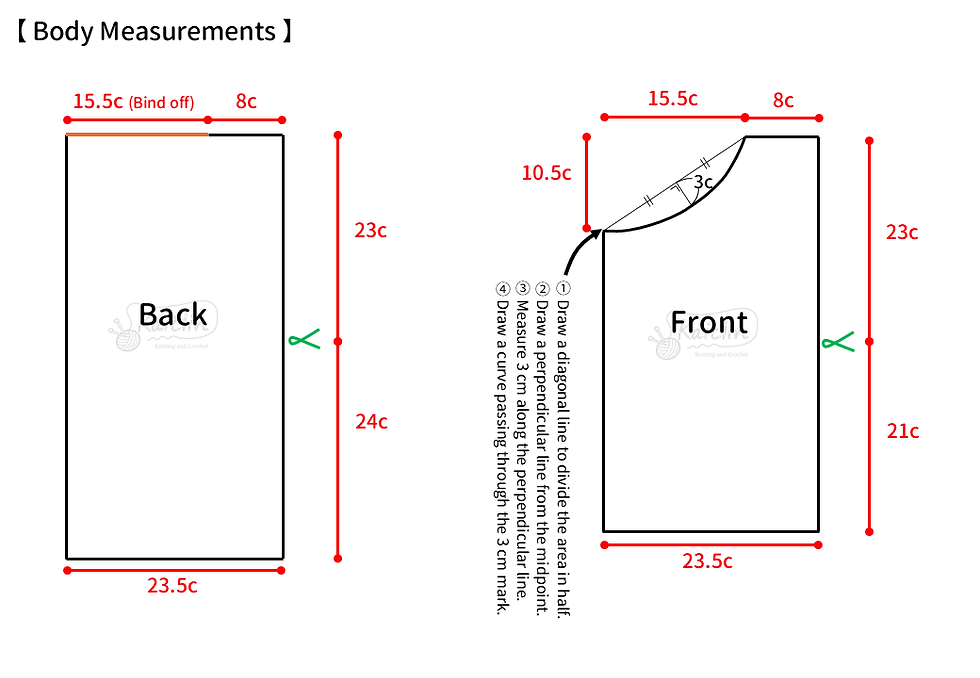
Refer to the 【Body Measurements】,
draw a full-size outline on graph paper,
and pin the pieces to shape before steaming for a cleaner finish. (Video ② 00:05)
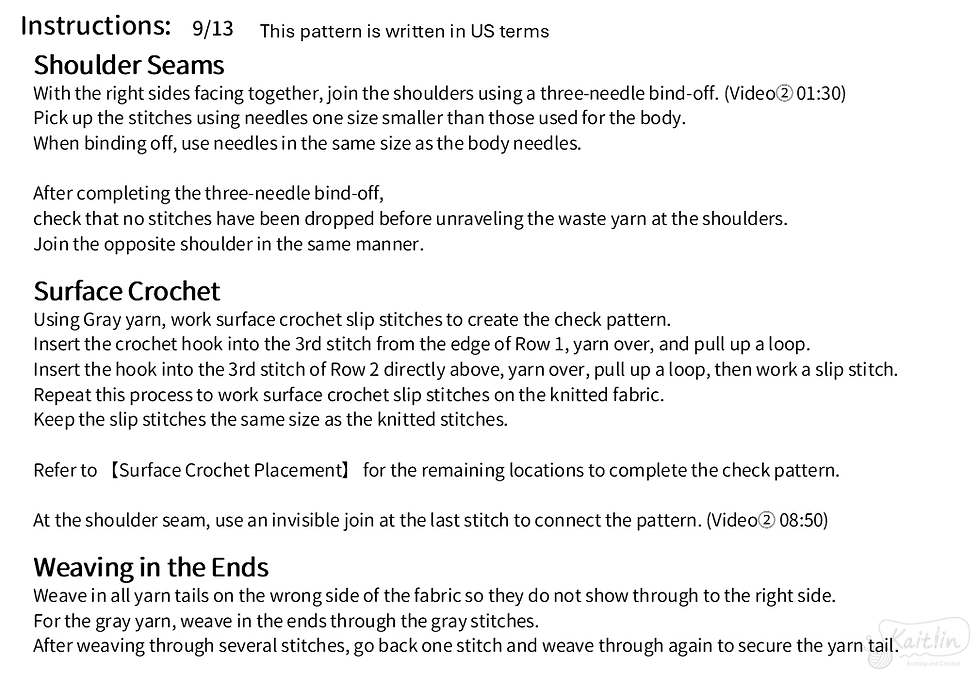
Shoulder Seams
With the right sides facing together,
join the shoulders using a three-needle bind-off. (Video② 01:30)
Pick up the stitches using needles one size smaller than those used for the body.
When binding off, use needles in the same size as the body needles.
After completing the three-needle bind-off,
check that no stitches have been dropped
before unraveling the waste yarn at the shoulders.
Join the opposite shoulder in the same manner.
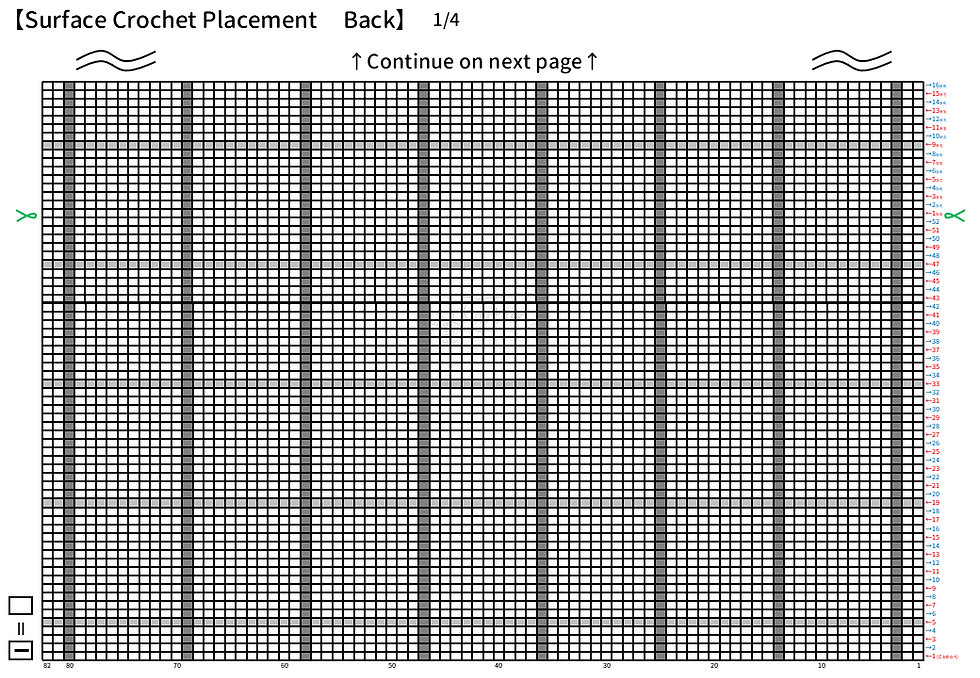
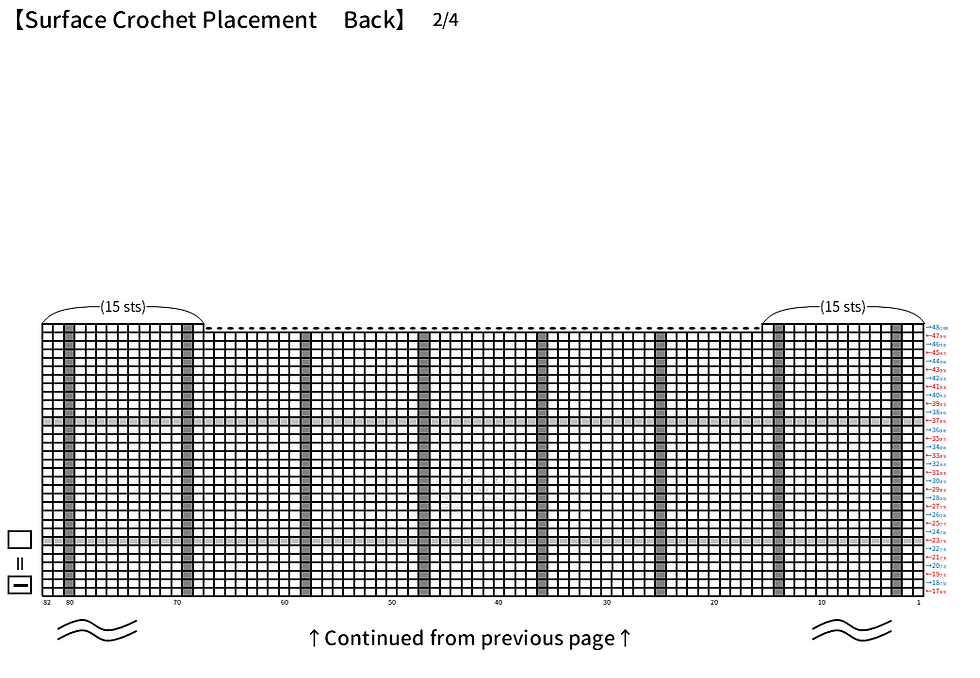
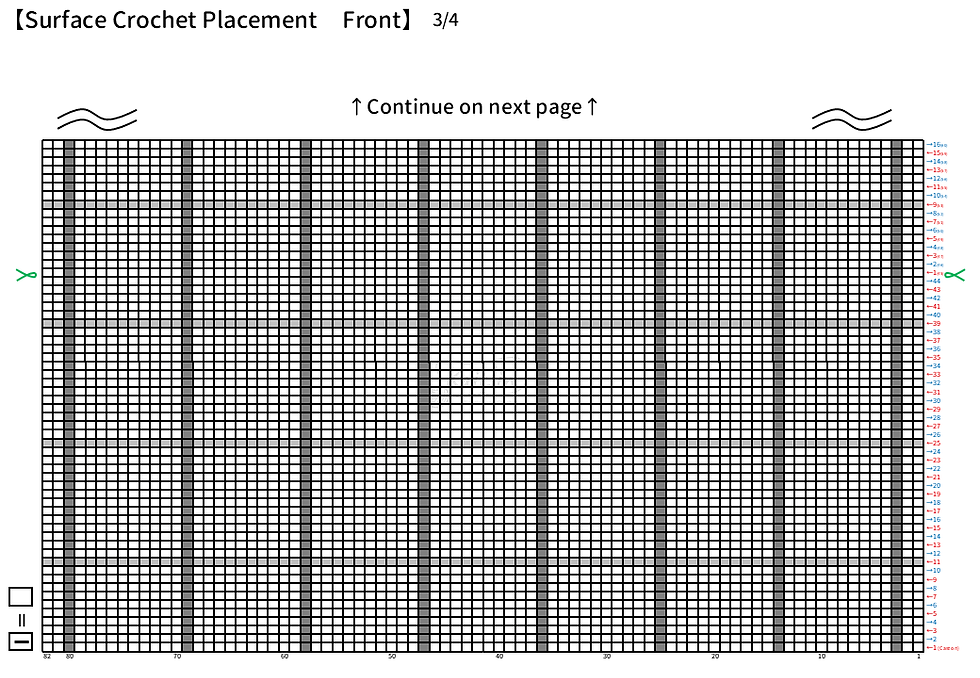
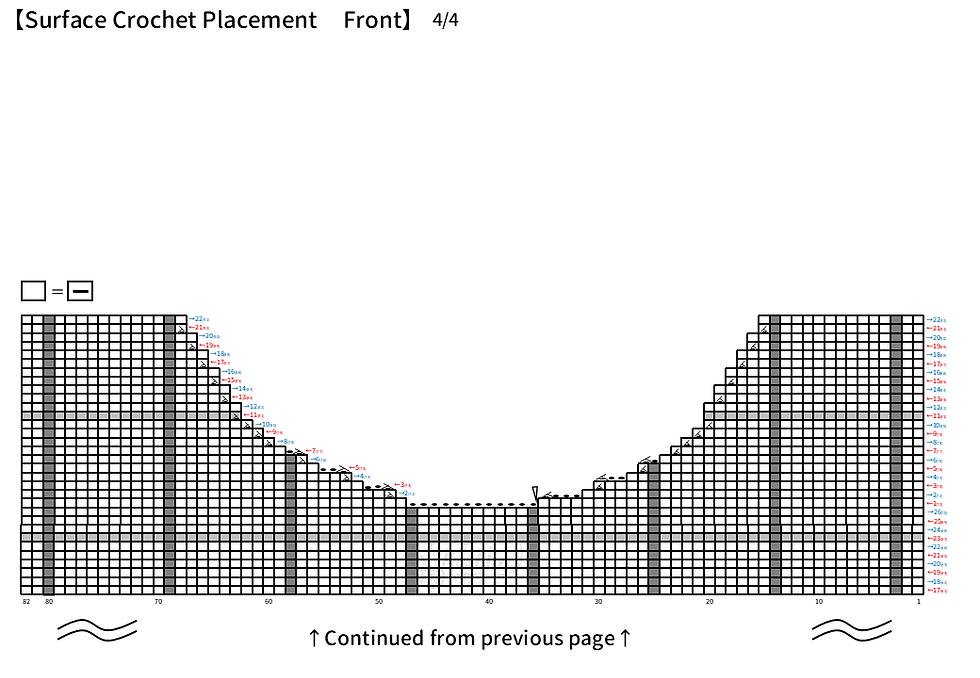
Surface Crochet
Using Gray yarn, work surface crochet slip stitches to create the check pattern.
Insert the crochet hook into the 3rd stitch from the edge of Row 1,
yarn over, and pull up a loop.
Insert the hook into the 3rd stitch of Row 2 directly above,
yarn over, pull up a loop, then work a slip stitch.
Repeat this process to work surface crochet slip stitches on the knitted fabric.
Keep the slip stitches the same size as the knitted stitches.
Refer to 【Surface Crochet Placement】 for the remaining locations to complete the check pattern.
At the shoulder seam,
use an invisible join at the last stitch to connect the pattern. (Video② 08:50)
Weaving in the Ends
Weave in all yarn tails on the wrong side of the fabric
so they do not show through to the right side.
For the gray yarn, weave in the ends through the gray stitches.
After weaving through several stitches,
go back one stitch and weave through again to secure the yarn tail.
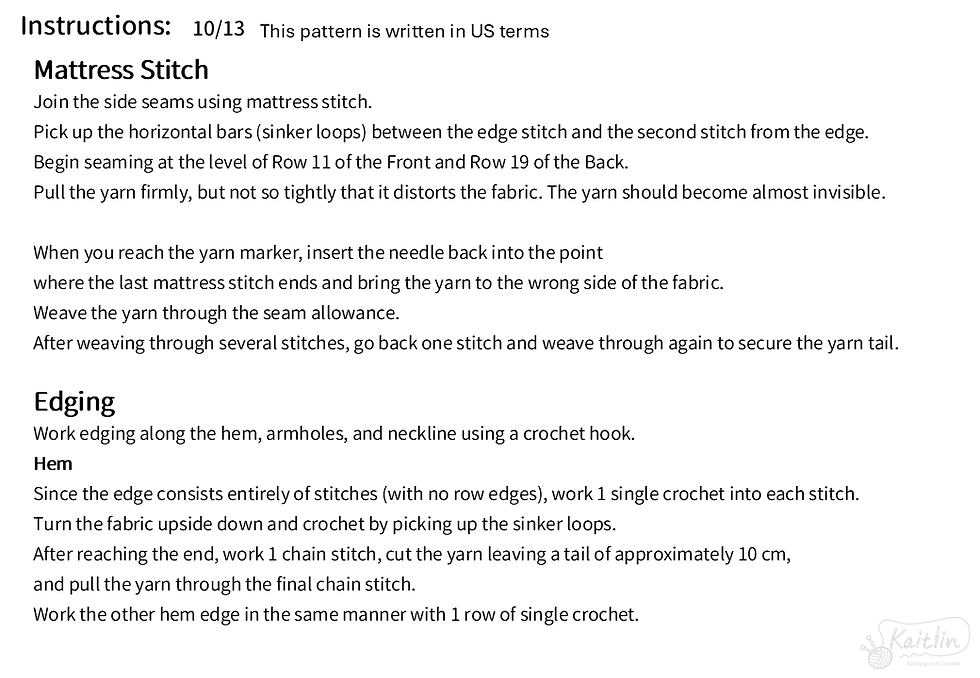
Mattress Stitch
Join the side seams using mattress stitch.
Pick up the horizontal bars (sinker loops)
between the edge stitch and the second stitch from the edge.
Begin seaming at the level of Row 11 of the Front and Row 19 of the Back.
Pull the yarn firmly,
but not so tightly that it distorts the fabric.
The yarn should become almost invisible.
When you reach the yarn marker, insert the needle back into the point
where the last mattress stitch ends and bring the yarn to the wrong side of the fabric.
Weave the yarn through the seam allowance.
After weaving through several stitches,
go back one stitch and weave through again to secure the yarn tail.
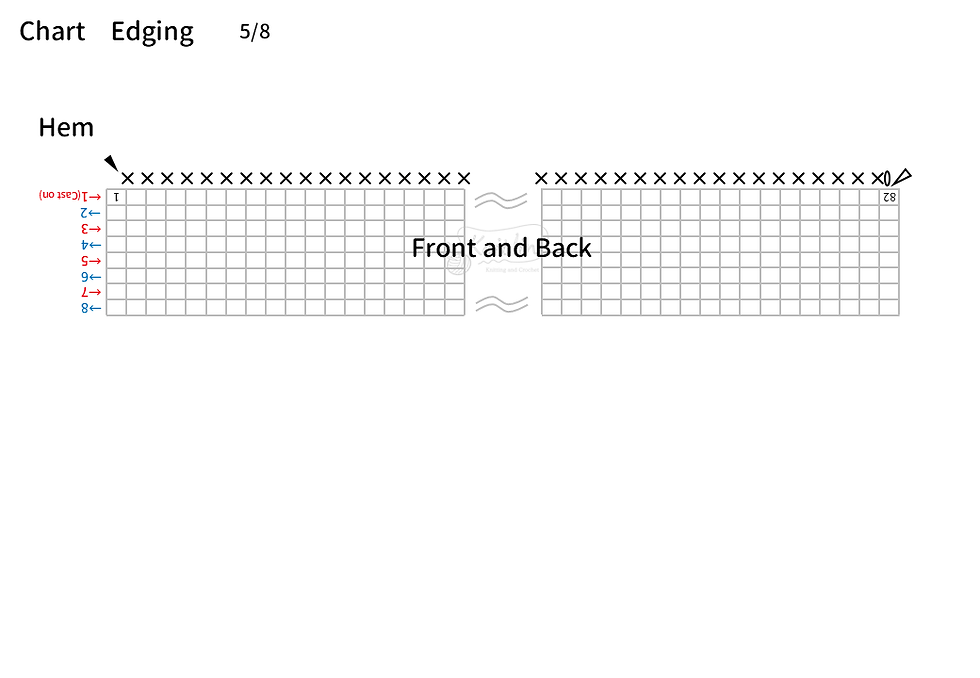
Edging
Work edging along the hem, armholes, and neckline using a crochet hook.
Hem
Since the edge consists entirely of stitches (with no row edges),
work 1 single crochet into each stitch.
Turn the fabric upside down and crochet by picking up the sinker loops.
After reaching the end, work 1 chain stitch,
cut the yarn leaving a tail of approximately 10 cm,
and pull the yarn through the final chain stitch.
Work the other hem edge in the same manner with 1 row of single crochet.
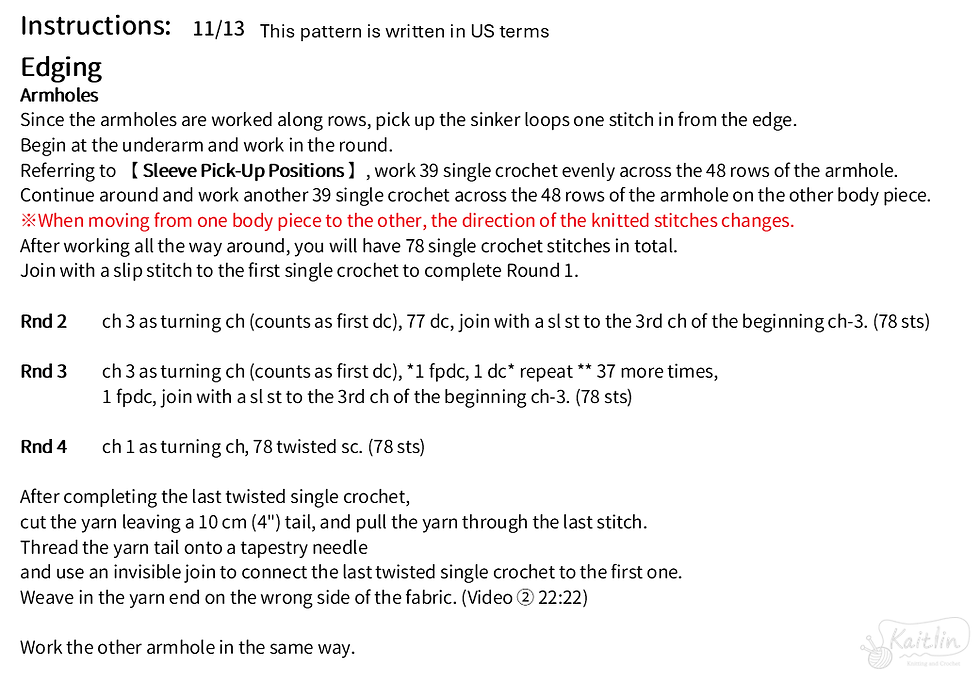
Armholes
Since the armholes are worked along rows,
pick up the sinker loops one stitch in from the edge.
Begin at the underarm and work in the round.
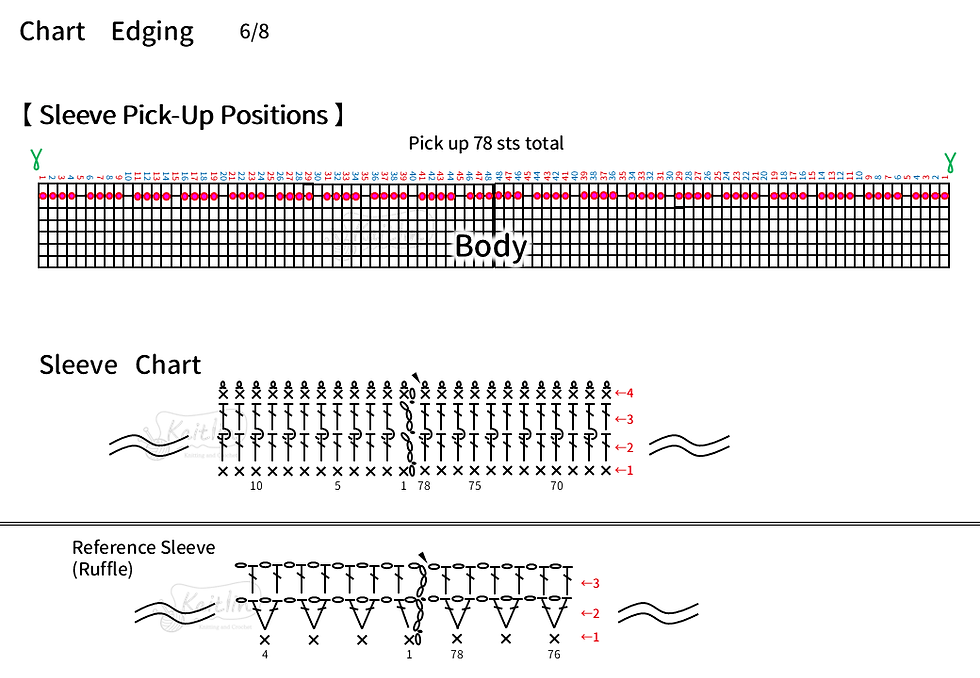
Referring to 【 Sleeve Pick-Up Positions 】,
work 39 single crochet evenly across the 48 rows of the armhole.
Continue around and work another 39 single crochet across the 48 rows of the armhole on the other body piece.
※When moving from one body piece to the other,
the direction of the knitted stitches changes.
After working all the way around,
you will have 78 single crochet stitches in total.
Join with a slip stitch to the first single crochet to complete Round 1.
Rnd 2
ch 3 as turning ch (counts as first dc),
77 dc, join with a sl st to the 3rd ch of the beginning ch-3. (78 sts)
Rnd 3
ch 3 as turning ch (counts as first dc),
*1 fpdc, 1 dc* repeat ** 37 more times,
1 fpdc, join with a sl st to the 3rd ch of the beginning ch-3. (78 sts)
Rnd 4
ch 1 as turning ch, 78 twisted sc. (78 sts)
After completing the last twisted single crochet,
cut the yarn leaving a 10 cm (4") tail,
and pull the yarn through the last stitch.
Thread the yarn tail onto a tapestry needle
and use an invisible join to connect the last twisted single crochet to the first one.
Weave in the yarn end on the wrong side of the fabric. (Video ② 22:22)
Work the other armhole in the same way.
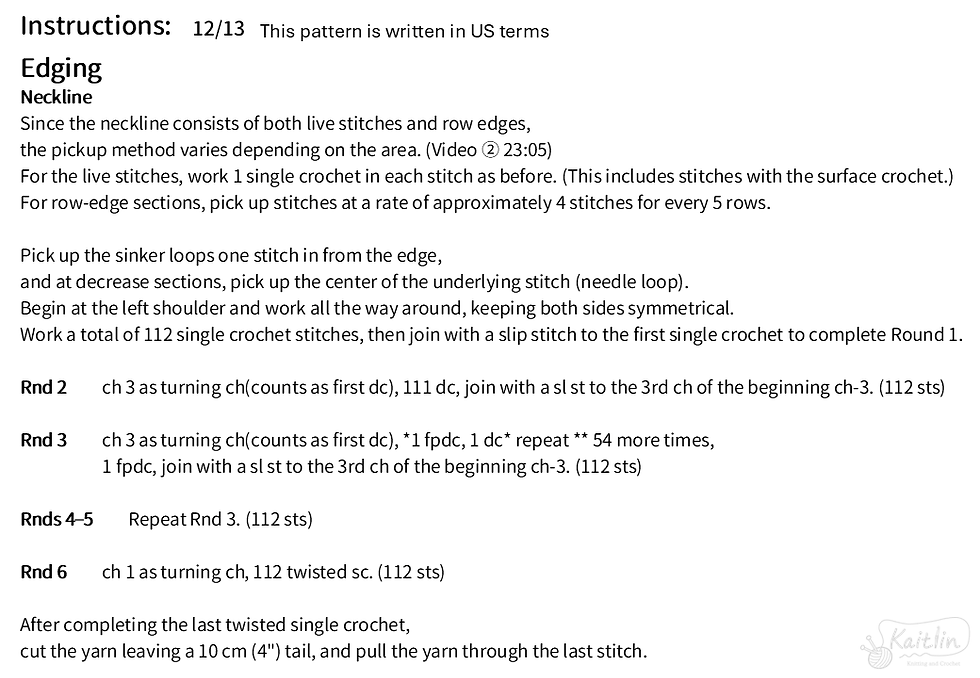
Neckline
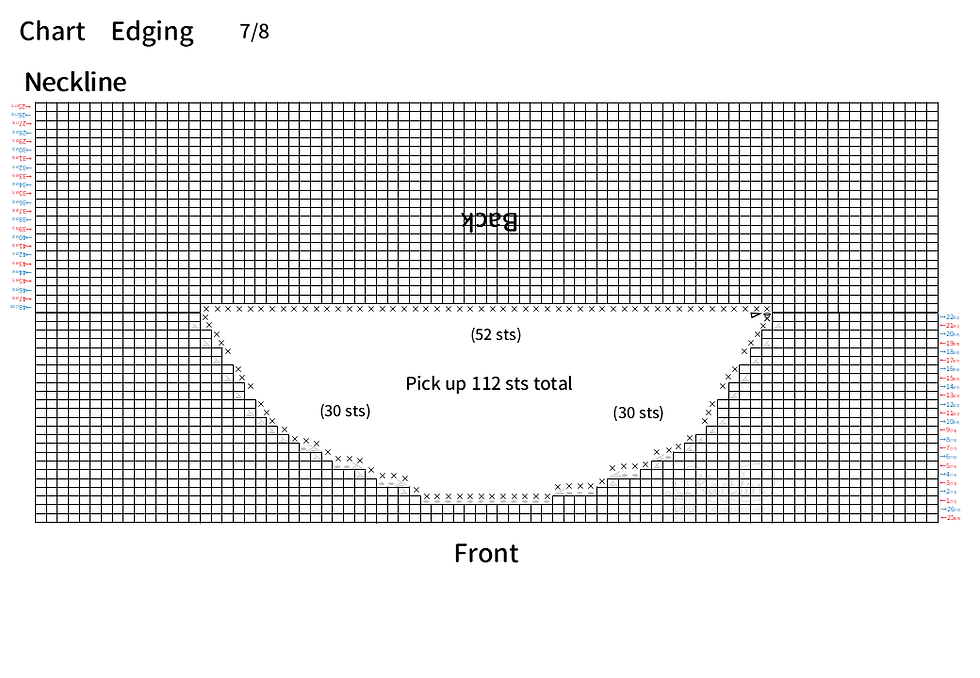
Since the neckline consists of both live stitches and row edges,
the pickup method varies depending on the area. (Video ② 23:05)
For the live stitches,
work 1 single crochet in each stitch as before. (This includes stitches with the surface crochet.)
For row-edge sections,
pick up stitches at a rate of approximately 4 stitches for every 5 rows.
Pick up the sinker loops one stitch in from the edge,
and at decrease sections,
pick up the center of the underlying stitch (needle loop).
Begin at the left shoulder and work all the way around,
keeping both sides symmetrical.
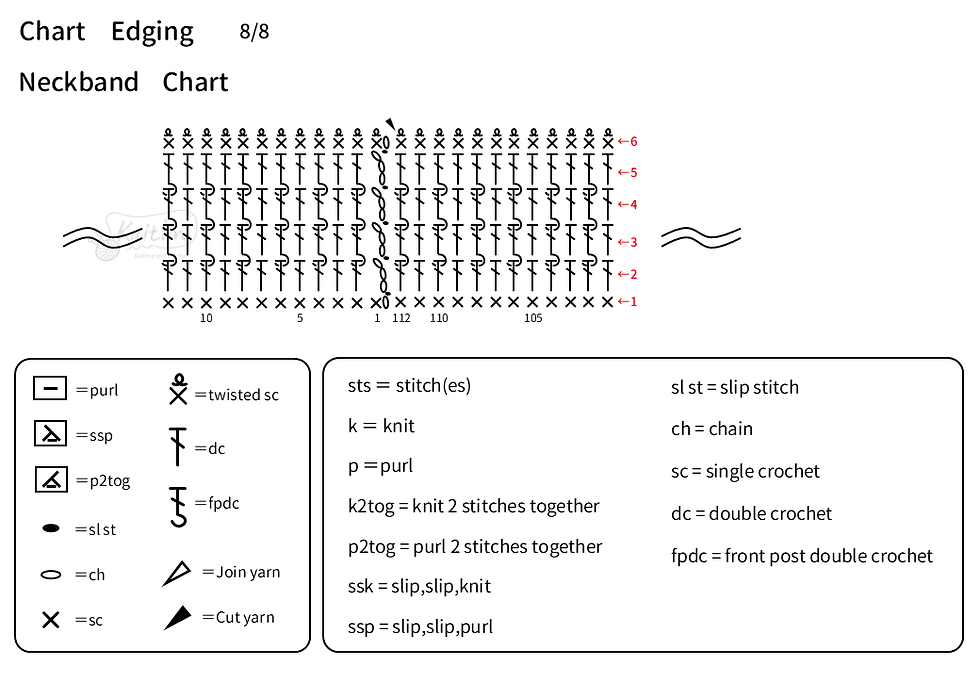
Work a total of 112 single crochet stitches,
then join with a slip stitch to the first single crochet to complete Round 1.
Rnd 2
ch 3 as turning ch(counts as first dc),
111 dc, join with a sl st to the 3rd ch of the beginning ch-3. (112 sts)
Rnd 3
ch 3 as turning ch(counts as first dc),
*1 fpdc, 1 dc* repeat ** 54 more times,
1 fpdc, join with a sl st to the 3rd ch of the beginning ch-3. (112 sts)
Rnds 4–5
Repeat Rnd 3. (112 sts)
Rnd 6
ch 1 as turning ch, 112 twisted sc. (112 sts)
After completing the last twisted single crochet,
cut the yarn leaving a 10 cm (4") tail, and pull the yarn through the last stitch.
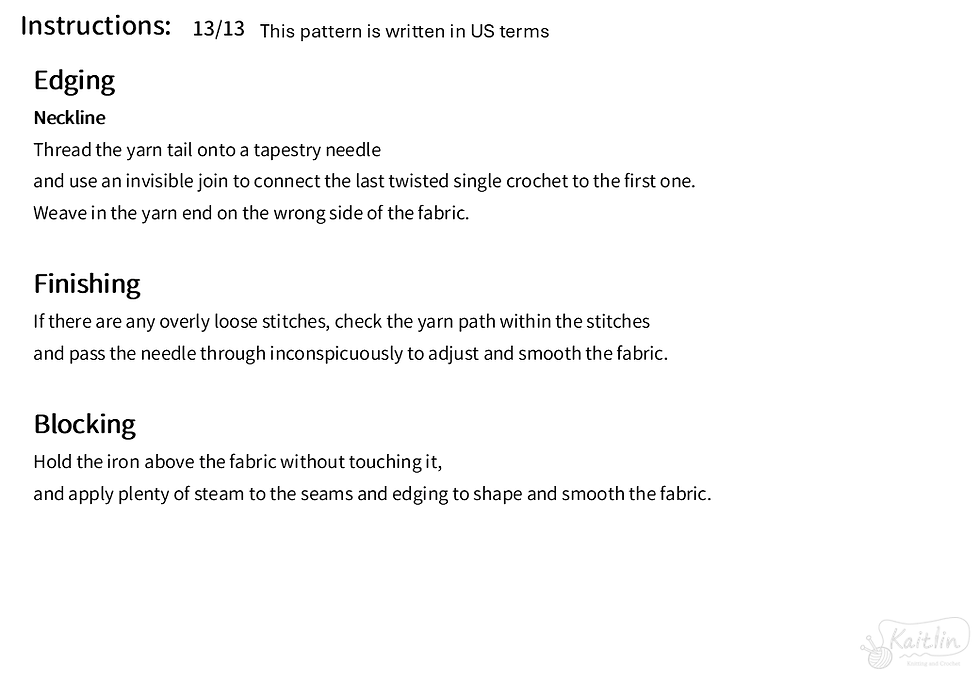
Thread the yarn tail onto a tapestry needle
and use an invisible join to connect the last twisted single crochet to the first one.
Weave in the yarn end on the wrong side of the fabric.
Finishing
If there are any overly loose stitches,
check the yarn path within the stitches
and pass the needle through inconspicuously to adjust and smooth the fabric.
Blocking
Hold the iron above the fabric without touching it,
and apply plenty of steam to the seams and edging to shape and smooth the fabric.
Congratulations, you've finished!
The look of this vest changes beautifully depending on the colors you choose,
so I hope you'll enjoy making it in your favorite color combination.
I also recommend trying the ruffle sleeve variation! (The pattern is included.)
I share many other knitting patterns as well.
Be sure to check out my other blog posts,
YouTube channel, Instagram, and LINE stickers!
Thank you so much for reading to the end. ☻
window pane tee knitting tutorial