

Textured Mini Shoulder Bag【Free Pattern】【Video】【Chart PDF】 Crochet tutorial
- May 1
- 5 min read
This pattern includes a tutorial video,
and you can scroll down to see the chart!


↓↓↓Here is the PDF file.↓↓↓(You can print it from here)
↑↑↑↑↑↑↑↑↑↑↑↑↑↑↑↑↑↑↑↑↑↑↑↑


Today, I’ll show you how to make this mini shoulder bag using a modified slip stitch.
Hi, I’m Kaitlin.
This time, I made this mini shoulder bag using a variation of the slip stitch that’s a little different from the usual.
I used a thick, tube-style yarn called TUBE, made of 100% nylon,
so the bag holds its shape well and is resistant to water.
It’s easy to make since you just repeat the same stitches,
so I hope you’ll give it a try!
Materials:
・ Yarn: TUBE (37 m / 40 g), Color 8 – 2 balls
or any super bulky weight yarn
・ 7 mm crochet hook
・ Tapestry needle
・ Stitch markers
・ Measuring tape
・ Scissors
・ Rings (32 mm diameter) – 2 pieces
Gauge:
Pattern stitch
Stitches: 5 pattern repeats (10 sts) = 6 cm
Rounds: 6.5 pattern repeats (13 rnds) = 8 cm
Size:
Width: approx. 12.5 cm Height: approx. 19 cm
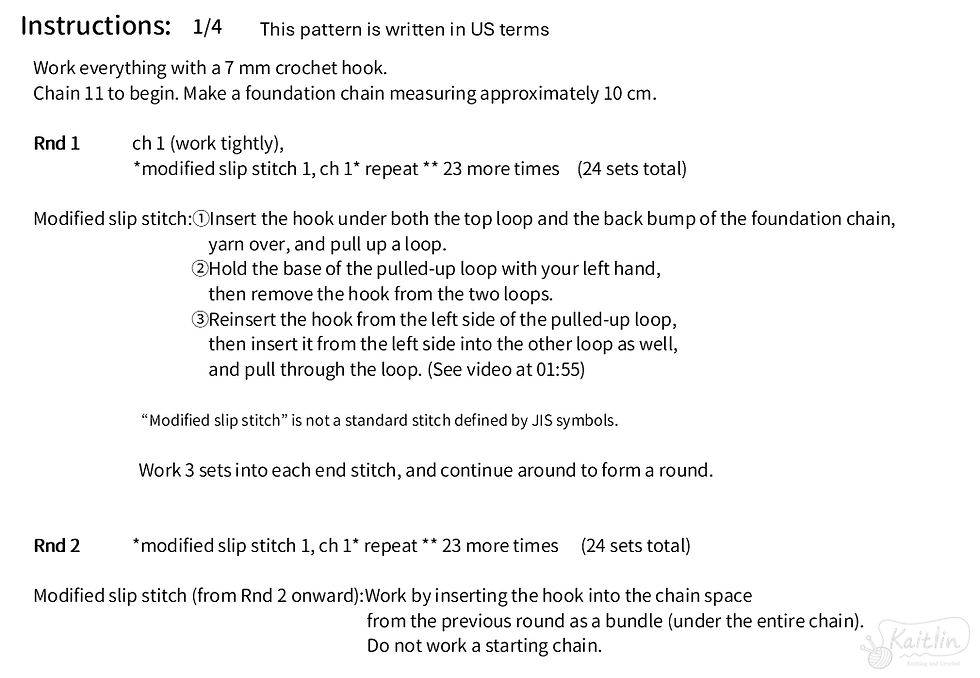
This pattern is written in US terms
Work everything with a 7 mm crochet hook.
Chain 11 to begin. Make a foundation chain measuring approximately 10 cm.
Rnd 1
ch 1 (work tightly),
*modified slip stitch 1, ch 1* repeat ** 23 more times (24 sets total)
Modified slip stitch:
①Insert the hook under both the top loop and the back bump of the foundation chain, yarn over, and pull up a loop.
②Hold the base of the pulled-up loop with your left hand, then remove the hook from the two loops.
③Reinsert the hook from the left side of the pulled-up loop, then insert it from the left side into the other loop as well, and pull through the loop. (See video at 01:55)
“Modified slip stitch” is not a standard stitch defined by JIS symbols.
Work 3 sets into each end stitch, and continue around to form a round.
Rnd 2
*modified slip stitch 1, ch 1* repeat ** 23 more times (24 sets total)
Modified slip stitch (from Rnd 2 onward):
Work by inserting the hook into the chain space from the previous round as a bundle (under the entire chain). Do not work a starting chain.
From Round 3 onward,
repeat the same instructions as Round 2 until the piece measures approximately 19 cm in height.(For reference: 31 rounds are worked in the video.)
Changing Yarn
When the yarn is running low,
switch to a new yarn while working a modified slip stitch.
Insert the hook into the chain space of the previous round,
leave about a 15 cm tail with the new yarn,
yarn over with the new yarn, and pull up a loop.
Remove the hook once, then complete the modified slip stitch.
Work 1 chain, then continue crocheting with the new yarn as before.
Leave the two yarn tails at the back of the work and carry them along until finishing.
Final Round
While working the final round, attach the rings to the sides.
Each ring is attached over 2 sets of modified slip stitches.
When you reach the side position, place the ring in front of the work,
insert the hook through the ring first, then into the chain space,
and work a modified slip stitch.
Repeat this once more to complete 2 sets and secure the ring.
After working 10 sets, attach the second ring on the opposite side in the same way.
Once both rings are attached, cut the yarn leaving a tail of about 15 cm,
and pull it through the final stitch.
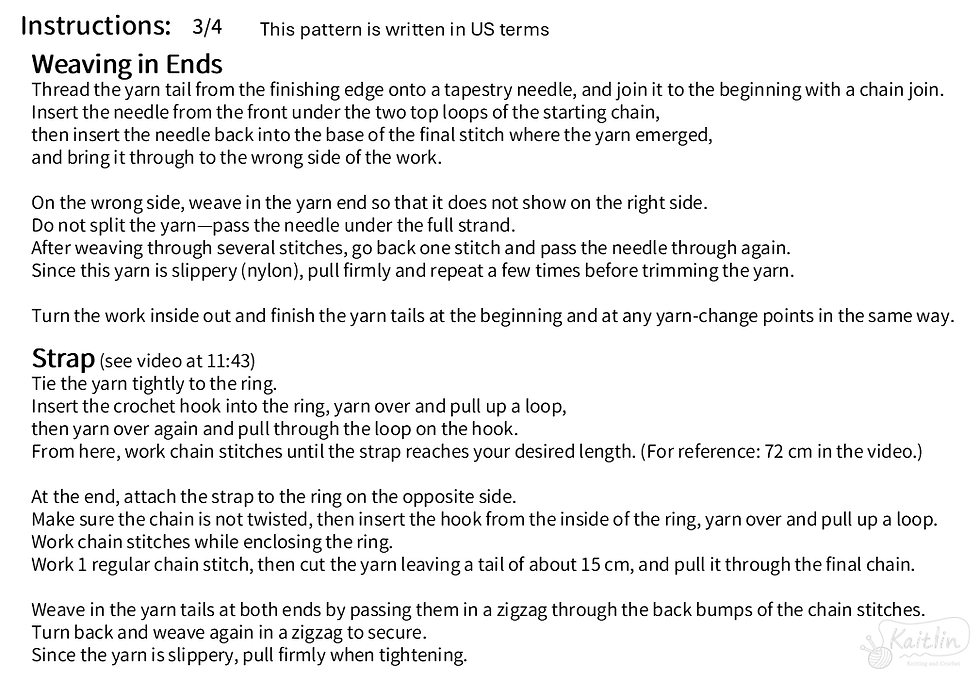
Weaving in Ends
Thread the yarn tail from the finishing edge onto a tapestry needle,
and join it to the beginning with a chain join.
Insert the needle from the front under the two top loops of the starting chain,
then insert the needle back into the base of the final stitch where the yarn emerged,
and bring it through to the wrong side of the work.
On the wrong side, weave in the yarn end so that it does not show on the right side.
Do not split the yarn—pass the needle under the full strand.
After weaving through several stitches, go back one stitch and pass the needle through again.
Since this yarn is slippery (nylon), pull firmly and repeat a few times before trimming the yarn.
Turn the work inside out and finish the yarn tails at the beginning and at any yarn-change points in the same way.
Strap (see video at 11:43)
Tie the yarn tightly to the ring.
Insert the crochet hook into the ring,
yarn over and pull up a loop,
then yarn over again and pull through the loop on the hook.
From here, work chain stitches until the strap reaches your desired length. (For reference: 72 cm in the video.)
At the end, attach the strap to the ring on the opposite side.
Make sure the chain is not twisted,
then insert the hook from the inside of the ring,
yarn over and pull up a loop.
Work chain stitches while enclosing the ring.
Work 1 regular chain stitch,
then cut the yarn leaving a tail of about 15 cm,
and pull it through the final chain.
Weave in the yarn tails at both ends by passing them in a zigzag through the back bumps of the chain stitches.
Turn back and weave again in a zigzag to secure.
Since the yarn is slippery, pull firmly when tightening.
Fringe
Attach fringe to the 10 chain sets between the rings.
Prepare yarn pieces cut to the following lengths:
16 cm × 4 strands
20 cm × 4 strands
25 cm × 2 strands
Attach the 25 cm strands to the two center chain spaces.
Insert the crochet hook from the back of the work,
fold a strand of yarn in half, place it on the hook,
and pull the loop through to the back side.
Even out the yarn ends, then pull both ends through the loop.
Pull firmly to secure the fringe.
In the same way, attach the remaining fringe,
making the lengths gradually shorter toward the sides.
Once all fringe is attached, trim to shape.
Once the length is shaped,
your project is complete—great job!
You can make this cute textured bag in just one day,
so I hope you’ll give it a try!
I also share other knitting patterns and tutorials,
so be sure to check out my other posts, as well as my YouTube,
Instagram, and LINE stickers!
Thank you so much for reading until the end! ☻
st(s) = stitch(es)
rnd(s) = round(s)
ch = chain
Textured Mini Shoulder Bag Crochet tutorial