

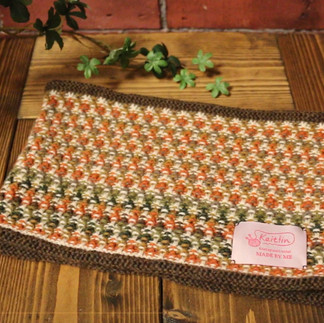
Colorwork-Style Neck Warmer【Free Pattern】【Video】【Chart PDF】 Knitting tutorial
- Apr 27
- 3 min read
Updated: May 1
This pattern includes a tutorial video,
and you can scroll down to see the chart!


↓↓↓Here is the PDF file.↓↓↓(You can print it from here)
↑↑↑↑↑↑↑↑↑↑↑↑↑↑↑↑↑↑↑↑↑↑↑↑


Today, I’ll show you how to make this colorwork-style neck warmer.
Hi, I’m Kaitlin.
This time, I used slipped stitches to create a colorwork-look neck warmer that even beginners can try.
The main pattern uses only purl stitches and slipped stitches,
and since the pattern repeat is just 4 rounds, it’s very easy to knit.
The edges are worked in stockinette stitch and then folded double,
giving the piece a nice dimensional look.
It’s a simple pattern,
so I hope you’ll enjoy knitting it in your favorite color combinations!
Materials:
・Yarn: Airy Wool Alpaca (100 m / 30 g)
(kuki wo mazete ito ni shita wool alpaca)
Note: Product name has been changed
Colors No.1, No.2, No.12 – 1 ball each
・ Circular needles: 4.5mm (40 cm)
(Longer needles can be used with the magic loop method)
・ Tapestry needle
・ Stitch markers
・ Scissors
・ Measuring tape
・ Steam iron
Gauge:
Pattern stitch26.5 sts × 38 rnds = 10 cm square
Size: (laid flat)
Width: approx. 28 cm
Height: approx. 22 cm
This pattern is written in US terms.
Stockinette Stitch ①
Using Color No. 2, cast on 148 sts using the long-tail cast-on method. (= Row 1)※Begin the cast-on approx. 330 cm from the yarn end, leaving a tail of approx. 150 cm.
Rnd 2 (Col. 2)
Join to work in the round from this row onward.
Be careful not to twist.
k148
Rnds 3–6 (Col. 2)
Work as Rnd 2. (Stockinette stitch)
After completing Rnd 6, continue with the pattern stitch.
Pattern Stitch
Pattern Rnd 1 (Col. 1)
p148
Pattern Rnd 2 (Col. 1)
Work as Pattern Rnd 1.
Pattern Rnd 3 (Col. 12)
p1, sl1 (pwise wyib), *p3, sl 1* repeat ** 35 more times, p2 (148 sts total)
Pattern Rnd 4 (Col.12)
Work in the same manner as Pattern Rnd 3. (148 sts total)
Pattern Rnd 5 (Col.2)
Pick up Color 2 yarn that has been carried along the back of the work
and work with an appropriate tension.
※Be careful not to pull too tightly.
*p3, sl1* repeat ** 36 more times. (148 sts total)
Pattern Rnd 6 (Col.2)
Work in the same manner as Pattern Rnd 5. (148 sts total)
Pattern Rnds 7–74
Repeat the instructions from Pattern Rnds 3–6.
※Change colors every 2 rnds.
Pattern Rnds 75–76
Work in the same manner as Pattern Rnds 3 and 4.
Stockinette Stitch Section ②
Rnds 1–6 k148 (Stockinette stitch)
After completing Rnd 6, bind off.
Once binding off is complete,
cut the yarn leaving a tail of approximately 150 cm,
and pull it through the final stitch.
Steam Blocking
Hover a steam iron over the fabric and apply plenty of steam to shape and smooth the stitches.
Finishing
Thread the yarn tail from the cast-on edge onto a tapestry needle.
Seam the outer loop of the cast-on edge to Rnd 6 of Stockinette Stitch Section ① (the raised stitches worked in Color 2). (See video at 12:13)
Work the seam so that the reverse stockinette side faces outward.
Once the seaming is complete,
weave in the yarn end on the wrong side so that it does not show through to the right side.
To secure the end, pass the needle through several stitches on the wrong side,
then go back one stitch and pass the needle through again before trimming the yarn.
Repeat the same process for the bind-off edge.
Thread the yarn tail onto a tapestry needle,
and join the last stitch to the first stitch using a chain join. (See video at 14:21)
Next, seam the back loop of the bind-off edge to Pattern Rnd 75 (the raised stitches worked in Color 12). (See video at 15:10)
After seaming, weave in the yarn end on the wrong side in the same manner as before,
making sure it does not show on the right side.
Finish any remaining yarn ends in the same way.
Finally, apply plenty of steam to the reverse stockinette sections at both ends to shape and even out the fabric.
All done—great job!
You can finish this in a day,
and it’s perfect for early spring,
so I hope you’ll give it a try!
I also share other knitting patterns and tutorials,
so be sure to check out my other posts, as well as my YouTube,
Instagram, and LINE stickers!
Thank you so much for reading until the end! ☻
rnd(s) = round(s)
st(s) = stitch(es)
pwise = purlwise
wyib = with yarn in back
k = knit
p = purl
colorwork-style neck warmer knitting tutorial