

crossbody bag【Free Pattern】【Video】【Chart PDF】crochet tutorial
Updated: Apr 17
This pattern includes a tutorial video,
and you can scroll down to see the chart!
↓↓↓Here is the PDF file.↓↓↓(You can print it from here)
↑↑↑↑↑↑↑↑↑↑↑↑↑↑↑↑↑↑↑↑


Hello! I'm Kaitlin.
This time, I used Eco-ANDARIA,
a summer classic yarn,
to crochet a stylish crossbody bag.
By adjusting the stitch count between the front and back panels,
the shape comes together in a more structured,
three-dimensional way.
With the addition of a lining, zipper, and strap,
the bag has a more polished, elevated look—
while the outer shell, made with single crochet stitches,
keeps it uniquely handmade and full of personality.
Materials:
・2 skeins Eco-ANDARIA col. 173 (80m/40g)
or any other medium weight (worsted) yarn
・1 skein Eco-ANDARIA Crochet col.808 (125m/30g)
or any other light worsted (DK) yarn
<Sample used in the video>
Black version
・2 skeins Eco-ANDARIA Kasuri-dyed col.256 (80m/40g)
・1 skein Eco-ANDARIA Crochet col.807 (125m/30g)
Brown version
・2 skeins Eco-ANDARIA Kasuri-dyed col.223 (80m/40g)
・1 skein Eco-ANDARIA Crochet col.802 (125m/30g)
・ 5.00mm crochet hook
・ Tapestry needle
・ Scissors
・ Measuring tape
・ Fabric for the lining
・ Vislon zipper (30 cm)
・ PP webbing (30 mm width)
・ Buckle
・ Slide adjuster (belt keeper)
・ Sewing thread
(choose colors that match the body, lining, and strap; polyester recommended)
・ Sewing needle
・ Pins
・ Craft clips
・ Fabric marking pen (tailor’s chalk pen)
・ Iron
Gauge:
12.5 sts × 14.5 rows = 10 cm × 10 cm (in single crochet)
Size:
Height: approx. 13 cm
Width: approx. 38 cm
Depth: approx. 10 cm
Front Panel
Hold Eco-ANDARIA and Eco-ANDARIA Crochet yarns together as one strand.
Make a foundation chain of 18 stitches.
It should measure approximately 15 cm in length.
Row 1
ch 1 as turning chain, 18 sc
After the turning chain at the beginning of each row, pull the working yarn to tighten the stitch.
For this row, insert the hook under both the top loop and back bump of the foundation chain when working sc.
Row 2
ch 1 as turning chain, turn your work, 18 sc
Rows 3–19
Repeat the instructions for Row 2.
How to Change Yarn
When changing yarn on the right side of the work:
When your single crochet is still incomplete,
bring the old yarn end from the front to the back over the hook.
Lay the new yarn (leaving about 15 cm of tail) on the back side of the fabric.
Yarn over with the new yarn and pull through all three loops on the hook.
Begin the next stitch using the new yarn.
When changing yarn on the wrong side of the work:
When your single crochet is still incomplete,
bring the old yarn end from the back to the front over the hook.
Lay the new yarn (leaving about 15 cm of tail) on the front side of the fabric.
Yarn over with the new yarn and pull through all three loops on the hook.
Begin the next stitch using the new yarn.
Leave both yarn tails as they are until you weave them in at the end.
Side Panel
Once you’ve completed Row 19 of the front panel,
continue directly by picking up stitches along the side to begin the side panel. (Video 07:18)
Side – Row 1
ch 1 as turning chain, 17 sc
After working the turning chain, pull the working yarn to tighten the stitch.
Refer to the chart labeled “Side Panel A” for stitch placement.
Side – Row 2
ch 1 as turning chain, turn your work, 17 sc
Side – Row 3
ch 1 as turning chain, turn your work, 1 sc, sc2tog, 11 sc, sc2tog, 1 sc (15 sts total)
Side – Rows 4–8
ch 1 as turning chain, turn your work , 15 sc
Side – Row 9
ch 1 as turning chain, turn your work, 1 sc, sc2tog, 9 sc, sc2tog, 1 sc (13 sts total)
Side – Row 10
ch 1 as turning chain, turn your work, 13 sc
Side – Row 11
ch 1 as turning chain, turn your work, 1 sc, sc2tog, 7 sc, sc2tog, 1 sc (11 sts total)
Side – Row 12
ch 1 as turning chain, turn your work, 11 sc
Side – Row 13
ch 1 as turning chain, turn your work, 1 sc, sc2tog, 5 sc, sc2tog, 1 sc (9 sts total)
Side – Row 14
ch 1 as turning chain, turn your work, 9 sc
Side – Row 15
ch 1 as turning chain, turn your work, 1 sc, sc2tog, 3 sc, sc2tog, 1 sc (7 sts total)
Side – Rows 16–18
ch 1 as turning chain, turn your work, 7 sc
After finishing Row 18, ch 1, cut the yarn leaving a 10 cm tail,
and pull the tail through the final chain to fasten off.
Now you’ve added a trapezoid-shaped side panel to one side of the square front panel.
Repeat the same steps to create a matching 18-row trapezoid panel on the opposite side of the front piece.
Refer to the chart labeled “Side Panel B” for stitch placement on Row 1.
Back Panel
Hold Eco-ANDARIA and Eco-ANDARIA Crochet yarns together as one strand.
Make a foundation chain of 10 stitches.
Row 1
ch 1 as turning chain, 10 sc
After working the turning chain, pull the working yarn to tighten the stitch.
For this row, insert the hook under both the top loop and back bump of the foundation chain when working sc.
Row 2
ch 1 as turning chain, turn your work , 10 sc
Rows 3–19
Repeat the instructions for Row 2.
After completing Row 19,
continue directly to the side panels,
just as you did for the front panel.
Use the same method as before to work Side Panel A.
Then attach yarn to the opposite side and crochet Side Panel B.
Flap
The flap is worked directly from the back panel.
With the right side of the fabric facing you,
pick up stitches starting from the 7th row (counting from the end of the trapezoid section on the RS). (Video 16:50)
Flap – Row 1
Join yarn, 12 sc (picked up from the side panel),
10 back loop only sc (into the back loops of the last row of the square section of the back panel),
12 sc (picked up from the other side panel) (34 sts total)
Flap – Row 2
ch 1 as turning chain, turn your work , 1 sc, sc2tog, 28 sc, sc2tog, 1 sc (32 sts total)
Flap – Row 3
ch 1 as turning chain, turn your work, 1 sc, sc2tog, 26 sc, sc2tog, 1 sc (30 sts total)
Flap – Row 4
ch 1 as turning chain, turn your work, 30 sc
Flap – Row 5
ch 1 as turning chain, turn your work, 1 sc, sc2tog, 24 sc, sc2tog, 1 sc (28 sts total)
Flap – Row 6
ch 1 as turning chain, turn your work, 28 sc
Flap – Row 7
ch 1 as turning chain, turn your work, 1 sc, sc2tog, 22 sc, sc2tog, 1 sc (26 sts total)
Flap – Row 8
ch 1 as turning chain, turn your work, 26 sc
Flap – Row 9
ch 1 as turning chain, turn your work, 1 sc, sc2tog, 20 sc, sc2tog, 1 sc (24 sts total)
Flap – Row 10
ch 1 as turning chain, turn your work, 1 sc, sc2tog, 18 sc, sc2tog, 1 sc (22 sts total)
Flap – Row 11
ch 1 as turning chain, turn your work, 1 sc, sc2tog, 16 sc, sc2tog, 1 sc (20 sts total)
Flap – Row 12
ch 1 as turning chain, turn your work, 1 sc, sc2tog, 14 sc, sc2tog, 1 sc (18 sts total)
Flap – Row 13
ch 1 as turning chain, turn your work, 1 sc, sc2tog, 12 sc, sc2tog, 1 sc (16 sts total)
Flap – Row 14
ch 1 as turning chain, turn your work, 1 sc, sc2tog, 10 sc, sc2tog, 1 sc (14 sts total)
Flap – Row 15
ch 1 as turning chain, turn your work, 1 sc, sc3tog, 6 sc, sc3tog, 1 sc (10 sts total)
To finish, ch 1, cut the yarn leaving a 10 cm tail,
and pull the tail through the final chain to fasten off.
Blocking with Steam Iron
Hold the iron above the fabric and apply plenty of steam evenly over the entire piece to relax and shape the stitches.
Be sure to steam thoroughly to smooth out the natural waviness of Eco-ANDARIA.
Leave the fabric undisturbed until it has completely cooled and dried.
Lining
Place the front and back panels on the lining fabric, and cut out each shape with a 1 cm seam allowance. (Video 24:16)
Sew a running stitch 7 mm from the edge along the bottom of the front panel lining. (Video 24:21)
Then gather the fabric until the bottom edge matches the width of the back panel lining,
and secure the thread with a knot.
With right sides together,
align the fabric pieces and pin them in place.
Sew around the edges—excluding the top opening—
using a sewing machine or backstitch by hand, 1 cm from the edge. (Video 25:35)
Next, sew a running stitch 7 mm from the top edge of the flap lining,
gather it so that the edge folds outward (to the wrong side) by about 1 cm,
and press with an iron. (Video 25:42)
Also fold the top edge of the front panel lining outward (to the wrong side) by about 1 cm and press with an iron.
Zipper
With the lining pieces still right sides together and the zipper right side up,
align one side of the zipper with the flap lining. (Video 26:20)
Adjust the position for balance, pin it in place,
and sew the zipper to the flap lining using backstitch.
Repeat the same process for attaching the other side of the zipper to the front panel lining’s top edge. (Video 27:45)
Shaping
Sew the crocheted panels together.With right sides facing,
align the front and back panels and secure the bottom edge using craft clips.
Start by clipping both ends and the center,
then clip the midpoints between them to evenly distribute the fabric.
Thread a single strand of Eco-ANDARIA onto a tapestry needle and sew the bottom edge using backstitch.
Insert the needle just as you did when picking up stitches for the trapezoid section—
through the two outer strands at the base of the single crochets,
or between the chain and the adjacent single crochet.
Since the front panel is wider,
pass the needle through the same spot on the back panel
more than once to ease the difference and secure the seam evenly.
For the foundation chain edge,
sew through the remaining back loops of the chain stitches.
Note: Be careful not to split the yarn while sewing, as this can cause the yarn to fray or break later.
Weaving in Ends
Once the panels are sewn together,
weave in all yarn tails on the wrong side of the fabric.Thread the yarn onto a tapestry needle,
and run the needle through several stitches on the wrong side,
making sure it doesn’t show on the right side.
Then go back one stitch and run the needle through again to secure the tail.
Steam Finishing
After sewing the panels together,
apply steam from the inside directly onto the seam allowances.
While the fabric is still warm,
press the seam allowances down to set them and smooth the fabric. (Video 32:26)
Caution: Steam can burn—handle with care.
Shaping – Part 2
Sew the lined fabric (with the zipper attached) onto the crocheted body.
Position the lining evenly along the flap and front panel,
and temporarily secure it with clips. (Video 32:48)
Using sewing thread in a color that closely matches the yarn,
sew the lining firmly in place.
Insert the needle into the same stitch locations as used when picking up stitches for the trapezoid section,
being careful not to split the yarn.
On the zipper side,
sew slightly outside the area where the lining is attached,
so the stitches don’t show through the lining. (Video 33:31)
For any visible stitches, insert the needle into the top loops of the final row.
Repeat the same process for the front panel side.
Start by clipping the center of the lining in place,
then clip the left and right sides,
making sure to leave 6 rows from the edge unsewn. (Video 35:00)
Check the balance, secure with clips, and sew as before.
PP Webbing (Strap)
Cut two pieces of PP webbing: one at 30 cm, and the other at 115 cm.
Thread the 30 cm piece through the female side of the buckle (Video 35:23),
align both ends, and sew them together with overcast stitch to finish the edge neatly.
Sew an overcast stitch on one end of the 115 cm strap as well to prevent fraying.
PP Webbing (Strap)
Insert the 30 cm piece of PP webbing into the back side of the front-right edge of the bag body. (Video 36:15)
※ Be sure the buckle is facing the correct direction.
If the lining is too large,
fold it inward toward the back panel to keep it out of the way.
Using sewing thread in a color that matches the bag,
sew the PP webbing to the bag with a U-shaped stitch,
starting from the bottom of the 6th row (counting from the top of the trapezoid section of the side panel) (Video 36:36)
Repeat the same process for the 115 cm piece of PP webbing.
Insert the stitched end into the back side of the front-left edge of the bag,
and secure it with a U-shaped stitch just as before.
Next, carefully check for any twists and thread the 115 cm webbing through the slide adjuster. (Video 38:33)
Then pass it through the buckle, and back through the slide adjuster again.
After finishing the edge with an overcast stitch,
fold it into thirds and secure it with a slip stitch.
Tie a knot on the inside where the strap is folded in, and trim the thread.
All done—great job!
Since the lining is sewn in securely,
this bag can be made with a wide variety of yarns,
without worrying too much about yarn strength.
I hope you'll try making your own original crossbody bag!
I also share other crochet patterns on this blog,
so feel free to check out my other posts,
YouTube channel, Instagram, and LINE stickers!
Thank you so much for reading to the end! ☻
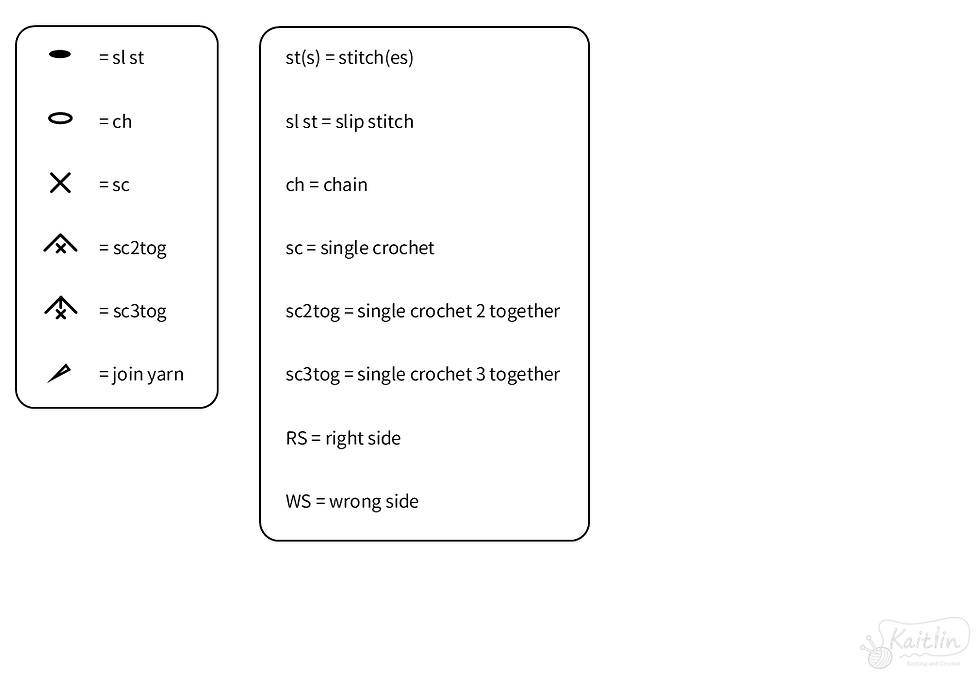
st(s) = stitch(es)
sl st = slip stitch
ch = chain
sc = single crochet
sc2tog = single crochet 2 together
sc3tog = single crochet 3 together
RS = right side
WS = wrong side
crochet tutorial