

Hooded Cardigan【Free Pattern】【Video】【Chart PDF】 Knitting tutorial
- Apr 9
- 19 min read
Updated: Apr 17
This pattern includes a tutorial video,
and you can scroll down to see the chart!


↓↓↓Here is the PDF file.↓↓↓(You can print it from here)
↑↑↑↑↑↑↑↑↑↑↑↑↑↑↑↑↑↑↑↑↑↑↑↑


Hello! I’m Kaitlin.
In this tutorial, I’ll show you
how to make this low-gauge hooded cardigan,
which works up quickly using super bulky yarn.
The pattern is designed to be as simple as possible
while still maintaining a nice shape,
so even if you’re new to making garments,
I highly encourage you to give it a try.
Since it has a short length,
if you’re comfortable with basic gauge calculations,
feel free to adjust the length to your preference.
Additionally, using techniques such as a provisional cast-on
or a tubular cast-on for the 2×2 rib will improve elasticity
and give your piece a more polished finish.
If you’re an intermediate or advanced knitter,
I highly recommend trying these methods!
Materials:
・ 4 skeins Lucy (200m/100g) Col.52 (or any other bulky weight yarn)
・Circular needles 6.60mm (recommended with 60cm / 24" cord), or a set of 4–5 double-pointed needles
・Circular needles 8.00mm (recommended with 60cm / 24" cord), or a set of 4–5 double-pointed needles
・ Waste yarn for provisional knitting (preferably smooth summer yarn such as cotton)
・ Buttons, 21mm diameter – 5 pieces
・ Tapestry needle
・ Stitch markers
・ Scissors
・ Measuring tape
・ Steam iron
(Sample variation shown in the video)
・15 skeins Combination Wool (38m/40g) col.7
・2 skeins Combination Wool (38m/40g) col.5
Gauge:
Stockinette stitch: 11 sts × 17 rows = 10 cm² (using 8 mm needles)
Finished Size:
Length: approx. 50.5 cmWidth: approx. 52 cm
Back Piece
2x2 Rib
For the cast-on, use one 8 mm needle.
Cast on 58 stitches using the long-tail cast-on method (= counts as Rib Row 1).
(For intermediate or advanced knitters,
a rib-friendly cast-on such as the 2x2 Rib Cast-On
or the Alternating Cable Cast-On is recommended.)
From Row 2 onward, switch to 6.60mm needles.
Rib Row 2
*p2, k2* repeat ** 13 more times, p2 (58 sts total)
Rib Row 3
*k2, p2 *repeat ** 13 more times, k2 (58 sts total)
Rib Rows 4–8
Repeat Rib Rows 2 and 3.
Work even-numbered rows as Rib Row 2 and odd-numbered rows as Rib Row 3.
Back Piece
Stockinette Stitch
After completing 8 rows of 2x2 rib,
continue in stockinette stitch. Work with 8 mm needles.
St st Row 1 (RS)
k58 (58 sts total)
St st Row 2 (WS)
p58 (58 sts total)
St st Rows 3–40
Repeat St st Rows 1 and 2.
Work odd-numbered rows as St st Row 1,
and even-numbered rows as St st Row 2.
St st Row 41 (RS)
k54, place the remaining 4 sts on hold with scrap yarn (54 sts total)
St st Row 42 (WS)
p50, place the remaining 4 sts on hold with scrap yarn (50 sts total)
St st Row 43 (RS)
k50 (50 sts total)
St st Row 44 (WS)
p50 (50 sts total)
St st Rows 45–78
Repeat St st Rows 43 and 44.
Work odd-numbered rows as St st Row 43,
and even-numbered rows as St st Row 44.
Provisional Knitting and Holding Stitches
After completing Row 78 in stockinette stitch,
leave the working yarn for the back piece at the edge,
and begin knitting temporarily with waste yarn for the shoulder.
For the right shoulder provisional section:
Using waste yarn, knit 16 sts from the edge, turn, and purl 16 sts.
Repeat these two rows,
knitting temporarily with waste yarn in stockinette stitch for about 6 rows.
When 6 rows are completed, bind off and cut the waste yarn.
Leave the main yarn (used for the body) with a tail about four times the width of one shoulder, then cut.
Next, place the neckline stitches on hold.
Starting from the stitch next to the right shoulder provisional knitting,
slip 18 sts onto waste yarn and hold them for the neckline.
For the left shoulder provisional section:
Starting from the stitch next to the held neckline stitches,
knit 16 sts with waste yarn, turn, and purl 16 sts.
Repeat these two rows,
knitting temporarily with waste yarn in stockinette stitch for about 6 rows.
When finished, bind off and cut the waste yarn.
Right Front Piece
2x2 Rib
For the cast-on, use one 8 mm needle.
Cast on 31 sts using the long-tail cast-on method (= Rib Row 1).
(For intermediate or advanced knitters,
a rib-friendly cast-on such as the 2x2 Rib Cast-On
or the Alternating Cable Cast-On is recommended.)
From Row 2 onward, switch to 6.60mm needles.
Rib Row 2
*p2, k2* repeat ** 6 more times, p3 (31 sts total)
Rib Row 3
k3, *p2, k2* repeat ** 6 more times (31 sts total)
Rib Rows 4–8
Repeat Rib Rows 2 and 3.
Work even-numbered rows as Rib Row 2,
and odd-numbered rows as Rib Row 3.
Right Front Piece
Stockinette Stitch
After completing 8 rows of 2x2 rib,
St st Row 1 (RS)
k31 (31 sts total)
St st Row 2 (WS)
p31 (31 sts total)
St st Rows 3–40
Repeat St st Rows 1 and 2.
Work odd-numbered rows as St st Row 1,
and even-numbered rows as St st Row 2.
St st Row 41 (RS)
k27, place the remaining 4 sts on hold with waste yarn (27 sts total)
St st Row 42 (WS)
p27 (27 sts total)
St st Row 43 (RS)
k27 (27 sts total)
St st Rows 44–76
Repeat St st Rows 42 and 43.
Work even-numbered rows as St st Row 42,
and odd-numbered rows as St st Row 43.
After completing Row 76, cut the working yarn, leaving a 15 cm tail.
Slip 11 sts from the edge onto waste yarn and hold them.
Once the held stitches are secured,
starting from the stitch next to them,
work 16 knit stitches with waste yarn. Turn, and purl 16 sts.
Repeat these two rows,
knitting temporarily with waste yarn in stockinette stitch for about 6 rows.
When finished, bind off and cut the waste yarn.
Left Front Piece
2x2 Rib
For the cast-on, use one 8 mm needle.
Cast on 31 sts using the long-tail cast-on method (= Rib Row 1).
(For intermediate or advanced knitters,
a rib-friendly cast-on such as the 2x2 Rib Cast-On
or the Alternating Cable Cast-On is recommended.)
From Row 2 onward, switch to 6.60mm needles.
Rib Row 2
p3, *k2, p2* repeat ** 6 more times (31 sts total)
Rib Row 3
*k2, p2* repeat ** 6 more times, k3 (31 sts total)
Rib Rows 4–8
Repeat Rib Rows 2 and 3.
Work even-numbered rows as Rib Row 2,
and odd-numbered rows as Rib Row 3.
Left Front Piece
Stockinette Stitch
After completing 8 rows of 2x2 rib,
St st Rows 1–40
Work in stockinette stitch as for the Right Front Piece.
St st Row 41 (RS)
k31 (31 sts total)
St st Row 42 (WS)
p27, place the remaining 4 sts on hold with waste yarn (27 sts total)
St st Row 43 (RS)
k27 (27 sts total)
St st Row 44 (WS)
p27 (27 sts total)
St st Rows 45–76
Repeat St st Rows 43 and 44.
Work odd-numbered rows as St st Row 43,
and even-numbered rows as St st Row 44.
After completing Row 76,
cut the working yarn, leaving a 60 cm tail.
Starting from the edge,
work 16 knit stitches with waste yarn, turn, and purl 16 sts.
Repeat these two rows,
knitting temporarily with waste yarn in stockinette stitch for about 6 rows.
When finished, bind off and cut the waste yarn.
Left Front Piece
Starting from the stitch next to the provisional section,
slip 11 sts onto waste yarn and hold them.
Steam Blocking
Hold the iron slightly above the fabric
and apply steam from the wrong side to shape
and even out the knitted piece.
For a neater finish,
pin the piece to the specified measurements before steaming.
Begin by pinning each edge,
then the center, and then the midpoints between the pins.
After steaming, leave the piece as it is until it has completely cooled.
Shoulder Seaming
(Mattress Stitch Method) (Video② 00:57)Use 6.60mm needles.
With right sides facing each other,
align the back and front pieces so that the front piece is closest to you.
Begin seaming from the right shoulder (as viewed from the front).
Fold the provisional section to the inside.
Insert the needle from front to back through the edge stitch of the last row of the front piece.
Next, insert the needle from back to front through the edge stitch of the last row of the back piece,
then draw the yarn through to the front stitch.
Insert the needle from front to back into the stitch next to the edge on the front piece.
Then insert the needle from back to front into the stitch next to the edge on the back piece,
and draw the yarn out through the front stitch.Repeat these steps across the seam.
When you finish at the edge,
check that all 16 shoulder stitches are now on the knitting needle.
Turn the work right side out and make sure no stitches have been dropped.
If any stitches have slipped off, remove the needle and redo the seaming.
Once the stitch count is confirmed,
slide the stitches onto the other tip of the circular needle
so that they are positioned on the left needle.
Using 8 mm needles, bind off while knitting each stitch.
Use the 60 cm tail left on the back piece (if it has already been cut, attach new yarn).
When you reach the last stitch,
pull the yarn through the final loop on the needle to secure it. (Video② 05:27)
Work the shoulder seam on the opposite side in the same way.
With right sides facing each other,
align the back and front pieces so the front piece is closest to you.
From the right shoulder edge,
pick up 16 sts from both the front and back pieces using 6.60mm needles.
Once 16 stitches are on the needle,
instead of pulling the needle through as before,
turn the work. (since a 60 cm yarn tail remains at the left edge)
Using 8 mm needles, bind off while purling each stitch.
After finishing the shoulder seam,
pull the yarn end of the provisional section to unravel the waste yarn.
Side Seaming (Mattress Stitch)
Join the sides of the body (2x2 rib for 8 rows + stockinette stitch for 40 rows = 48 rows in total).
Begin by seaming the back piece to the right front piece. (Video② 08:22)
Cut a length of yarn about 20 cm longer than the side seam and thread it onto a tapestry needle.
With right sides facing out,
align the back piece and the right front piece edge to edge.
Begin seaming from the ribbing at the hem.At the starting point,
pass the needle under the first stitch so that the seam matches the look of the cast-on edge. (Video② 09:10)
From the second row onward,
seam by picking up the horizontal bar between the edge stitch and the second stitch on both pieces.
Insert the needle back into the spot where the yarn last emerged,
alternating row by row and picking up these bars from each piece.
Tighten the yarn after each stitch.
Be careful not to pull too tightly,
as this may cause the fabric to pucker. Adjust the tension while watching the fabric.
Since the back piece has one extra row compared to the right front piece,
pick up two horizontal bars from the back piece at one point along the seam to adjust the row count.
If you are worried about uneven seaming,
it helps to place markers along the sides beforehand,
dividing the rows into sections.
This way, any discrepancies can be corrected as you go.
Seam the left front piece to the back piece in the same way.
As the left front piece has one extra row,
adjust by picking up two horizontal bars from the left front piece,
just as you did earlier.
Leave the yarn ends as they are for now.
Left Sleeve (Video② 15:32)
Pick up stitches from the body to begin working the sleeve.
Use 8 mm needles for picking up.
Start with the left sleeve on the right-hand side of the front.
Insert the needle between the edge stitch and the second stitch from the edge.
From the left front armhole,
beginning at the end of the held stitches, pick up 25 sts in total.
Since the armhole edge of the front has 36 rows,
adjust the spacing of your pick-ups as follows:
Pick up 3 sts, skip 1 row, *pick up 2 sts, skip 1 row* repeat ** 9 more times, pick up 2 sts (25 sts total).
After 25 sts have been picked up, place a marker on the needle for clarity.
Continue picking up stitches from the back piece.
Pick up 26 sts in total from the back armhole.
Since the back armhole has 38 rows, adjust the spacing as follows:
*pick up 2 sts, skip 1 row* repeat ** 11 more times, pick up 2 sts (26 sts total).
Be mindful that the stitches picked up along the back are worked in the opposite direction,
so pay attention to the stitch orientation.
In total, pick up 25 sts from the front and 26 sts from the back = 51 sts (this counts as Sleeve Row 1).
From Row 2 onward, turn the work at the end of each row and continue in flat knitting.
Sleeve Row 2 (WS)
p51 (51 sts total)
Sleeve Row 3 (RS)
k51 (51 sts total)
Sleeve Rows 4–6
Repeat Sleeve Rows 2 and 3 in stockinette stitch.
Work even-numbered rows as Sleeve Row 2,
and odd-numbered rows as Sleeve Row 3.
After completing 6 rows,
continue with the sleeve shaping (decrease rows).
Work sleeve decreases every 8th row,
decreasing 1 stitch at each side of the fabric.
Sleeve Dec Row 1 (RS)
k51 (51 sts total)
Sleeve Dec Row 2 (WS)
p51 (51 sts total)
Sleeve Dec Rows 3–8
Repeat Sleeve Dec Rows 1 and 2 in stockinette stitch.
Sleeve Dec Row 9 (RS)
ssk, k47, k2tog (49 sts total)
Sleeve Dec Row 10 (WS)
p49 (49 sts total)
Sleeve Dec Row 11 (RS)
k49 (49 sts total)
Sleeve Rows 12–16
Repeat Sleeve Dec Rows 10 and 11 in stockinette stitch.
Sleeve Dec Row 17 (RS)
ssk, k45, k2tog (47 sts total)
Sleeve Dec Row 18 (WS)
p47 (47 sts total)
Sleeve Dec Row 19 (RS)
k47 (47 sts total)
Sleeve Dec Rows 20–24
Repeat Sleeve Dec Rows 18 and 19 in stockinette stitch.
Sleeve Dec Row 25 (RS)
ssk, k43, k2tog (45 sts total)
Sleeve Dec Row 26 (WS)
p45 (45 sts total)
Sleeve Dec Row 27 (RS)
k45 (45 sts total)
Sleeve Dec Rows 28–32
Repeat Sleeve Dec Rows 26 and 27 in stockinette stitch.
Sleeve Dec Row 33 (RS)
ssk, k41, k2tog (43 sts total)
Sleeve Dec Row 34 (WS)
p43 (43 sts total)
Sleeve Dec Row 35 (RS)
k43 (43 sts total)
Sleeve Dec Rows 36–40
Repeat Sleeve Dec Rows 34 and 35 in stockinette stitch.
Sleeve Dec Row 41 (RS)
ssk, k39, k2tog (41 sts total)
Sleeve Dec Row 42 (WS)
p41 (41 sts total)
Sleeve Dec Row 43 (RS)
k41 (41 sts total)
Sleeve Dec Rows 44–48
Repeat Sleeve Dec Rows 42 and 43 in stockinette stitch.
Sleeve Dec Row 49 (RS)
ssk, k37, k2tog (39 sts total)
Sleeve Dec Row 50 (WS)
p39 (39 sts total)
Sleeve Dec Row 51 (RS)
k39 (39 sts total)
Sleeve Dec Rows 52–56
Repeat Sleeve Dec Rows 50 and 51 in stockinette stitch.
Sleeve Dec Row 57 (RS)
ssk, k35, k2tog (37 sts total)
Sleeve Dec Row 58 (WS)
p37 (37 sts total)
Sleeve Dec Row 59 (RS)
k37 (37 sts total)
Sleeve Dec Rows 60–64:
Repeat Sleeve Dec Rows 58 and 59 in stockinette stitch.
After completing Row 64, continue with 2x2 ribbing.Switch to 6.60mm needles.
Rib Row 1
*k2, k2tog, k1, k2tog, k1, k2tog* repeat ** 2 more times, k2, k2tog, k1, k2tog (26 sts total)
Rib Row 2
*p2, k2* repeat ** 5 more times, p2 (26 sts total)
Rib Row 3
*k2, p2* repeat ** 5 more times, k2 (26 sts total)
Rib Rows 4–8
Repeat Rib Rows 2 and 3 in 2x2 rib.
After completing Rib Row 8, bind off in pattern.
Work knit stitches as knits and purl stitches as purls while binding off.
When you reach the last stitch,
cut the yarn leaving a tail equal to the sleeve seam length plus about 30 cm.
Thread the yarn through the final loop on the needle to secure it.
Right Sleeve
For the right sleeve,
pick up stitches from the armhole edge of the back piece,
beginning at the end of the held stitches.
Use 8 mm needles.Although the direction is reversed,
pick up the same number of stitches as for the left sleeve:
26 sts from the back piece and 25 sts from the front piece.
Work the sleeve as for the left sleeve,
knitting back and forth in rows.
Knit the first 6 rows in stockinette stitch without shaping.
Then, continue with the sleeve decreases for 64 rows.
Switch to 6.60mm needles and work 8 rows in 2x2 rib.
Bind off in pattern,
knitting the knit stitches and purling the purl stitches.
Leave a tail long enough for seaming—about the sleeve seam length plus 30 cm.
Seaming the Sleeve (Mattress Stitch)
Seam the underarm using mattress stitch.
Starting from the bound-off edge,
seam together the ribbing (8 rows) plus the sleeve decreases (64 rows),
for a total of 72 rows.
Thread the yarn tail onto a tapestry needle.
Pick up both loops of the first bound-off stitch
so that the seam matches the look of the bind-off edge. (Video② 29:50)
Next, insert the needle into the last loop where the yarn emerges,
and through the final bound-off stitch, then pull the yarn through. (Video② 30:18)
From here, continue as for the side seams:
pick up the horizontal bar between the edge stitch
and the second stitch alternately from each piece.
Since the knitting direction is different from the body side seam,
pay attention to stitch orientation as you seam.
After seaming partway, try the garment on to check the sleeve opening size.
At the decreases on Rib Row 1,
insert the needle diagonally through the horizontal bar
between the edge stitch and the second stitch
and the center of the stitch below the overlapped decrease stitch.
For all other decrease points along the sleeve, seam in the same way:
insert the needle diagonally through the horizontal bar
between the edge stitch and the second stitch
and the center of the stitch below the overlapped decrease stitch.
After finishing the 72 rows of the underarm seam,
continue by joining the held stitches of the back piece
with the first 6 rows of the sleeve using a stitch-to-row seam (Video② 33:10).
Insert the needle from back to front through the first held stitch of the back piece.
Next, pick up 2 rows of the underarm horizontal bars and pull the yarn through.
Then insert the needle from front to back into the same first held stitch,
and from back to front into the second held stitch.
Next, pick up 1 row of the underarm horizontal bar and pull the yarn through.
Insert the needle from front to back into the second held stitch,
and from back to front into the third held stitch.
Next, pick up 2 rows of the underarm horizontal bars and pull the yarn through.
Insert the needle from front to back into the third held stitch,
and from back to front into the fourth held stitch.
Next, pick up 1 row of the underarm horizontal bar and pull the yarn through.
Finally, insert the needle from front to back into the fourth held stitch,
and bring the yarn through to the wrong side of the fabric.
On the opposite side,
work the stitch-to-row seam in the same way, but mirrored.
Hood (Video③ 00:09)
First, transfer all the held stitches of the neckline back onto the needle:
11 sts from the front, 18 sts from the back,
and 11 sts from the other front, for a total of 40 sts on the needle.
Hood Row 1 (RS)
k11, *k2, LLI, k3, LLI* repeat ** 2 more times, k14 (46 sts total)
Hood Row 2 (WS)
p46 (46 sts total)
Hood Row 3 (RS)
k46 (46 sts total)
Hood Rows 4–6
Repeat Hood Rows 2 and 3 in stockinette stitch.
Hood Row 7 (RS)
k22, RLI, k1, PM, k1, LLI, k22 (48 sts total)
Hood Row 8 (WS)
p48 (48 sts total)
Hood Row 9 (RS)
k48 (48 sts total)
Hood Rows 10–14
Repeat Hood Rows 8 and 9 in stockinette stitch.
Hood Row 15 (RS)
k23, RLI, k1, SM, k1, LLI, k23 (50 sts total)
Hood Row 16 (WS)
p50 (50 sts total)
Hood Row 17 (RS)
k50 (50 sts total)
Hood Rows 18–22
Repeat Hood Rows 16 and 17 in stockinette stitch.
Hood Row 23 (RS)
k24, RLI, k1, SM, k1, LLI, k24 (52 sts total)
Hood Row 24 (WS)
p52 (52 sts total)
Hood Row 25 (RS)
k52 (52 sts total)
Hood Rows 26–30
Repeat Hood Rows 24 and 25 in stockinette stitch.
After completing the 30 rows of the hood increases,
continue with the decrease section of the hood.
Hood Dec Row 1 (RS)
k52 (52 sts total)
Hood Dec Row 2 (WS)
p52 (52 sts total)
Hood Dec Rows 3–12
Repeat Hood Dec Rows 1 and 2 in stockinette stitch.
Hood Dec Row 13 (RS)
k24, k2tog, SM, ssk, k24 (50 sts total)
Hood Dec Row 14 (WS)
p50 (50 sts total)
Hood Dec Row 15 (RS)
k50 (50 sts total)
Hood Dec Rows 16–18
Repeat Hood Dec Rows 14 and 15 in stockinette stitch.
Hood Dec Row 19 (RS)
k23, k2tog, SM, ssk, k23 (48 sts total)
Hood Dec Row 20 (WS)
p48 (48 sts total)
Hood Dec Row 21 (RS)
k48 (48 sts total)
Hood Dec Row 22 (WS)
p48 (48 sts total)
Hood Dec Row 23 (RS)
k22, k2tog, SM, ssk, k22 (46 sts total)
Hood Dec Row 24 (WS)
p46 (46 sts total)
Hood Dec Row 25 (RS)
k21, k2tog, SM, ssk, k21 (44 sts total)
Hood Dec Row 26 (WS)
p44 (44 sts total)
Hood Dec Row 27 (RS)
k20, k2tog, SM, ssk, k20 (42 sts total)
Hood Dec Row 28 (WS)
p42 (42 sts total)
Hood Dec Row 29 (RS)
k19, k2tog, SM, ssk, k19 (40 sts total)
Hood Dec Row 30 (WS)
p40 (40 sts total)
Grafting the Hood (Video③ 08:56)
After completing 30 decrease rows,
graft the top of the hood using Kitchener stitch.
Pull the center cord to divide the stitches,
placing 20 sts on the front needle and 20 sts on the back needle.
Cut the yarn, leaving a tail about 4 times the width of the hood top,
and thread it onto a tapestry needle.
Insert the needle purlwise into the first stitch on the front needle
and leave it on the needle.
Next, insert the needle knitwise into the first stitch on the back needle
and leave it on the needle.
Work as if forming one row while joining the pieces,
taking care not to pull the yarn too tightly.
Insert the needle knitwise into the first stitch on the front needle (as if returning the yarn),
then purlwise into the second stitch on the front needle.
Next, insert the needle purlwise into the first stitch on the back needle (as if returning the yarn),
then knitwise into the second stitch on the back needle.
Continue in this manner:
insert the needle knitwise into the second stitch on the front needle
and purlwise into the third stitch on the front needle.
Then insert the needle purlwise into the second stitch on the back needle
and knitwise into the third stitch on the back needle.
Repeat these steps across the row until all stitches are grafted with Kitchener stitch.
To finish, insert the needle knitwise into the last stitch on the front needle,
and purlwise into the last stitch on the back needle.
Bring the yarn to the wrong side of the fabric.
To keep it invisible on the right side,
weave the needle through the back of the fabric,
splitting the strands slightly.
Go back one stitch, weave through again, and secure the yarn tail.
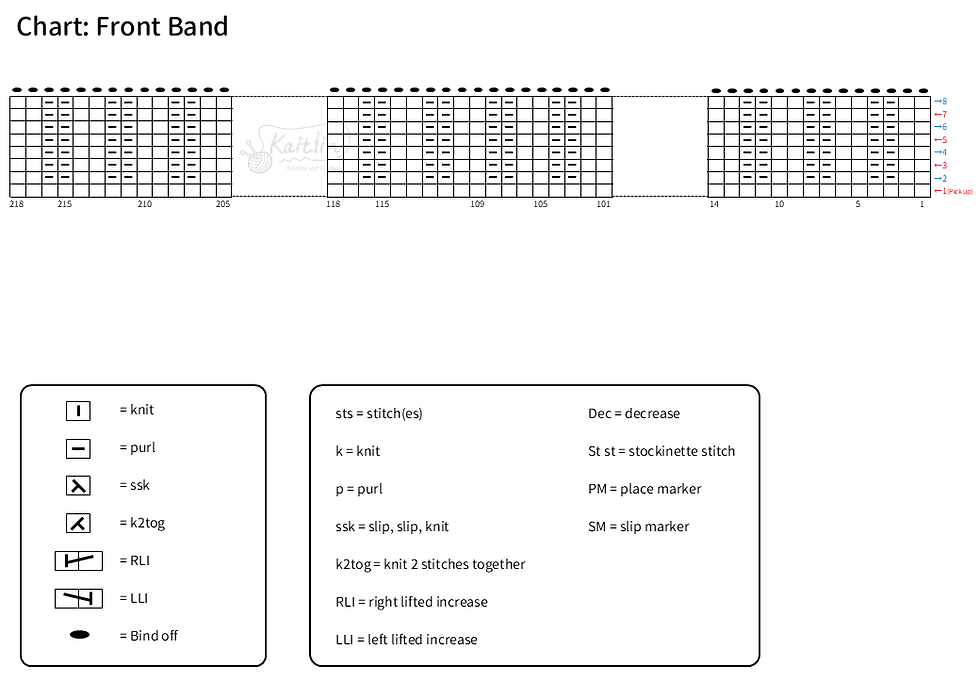
Front Band (Video③ 13:13)
Since this project is knitted at a low gauge with large stitches,
the buttonholes will be worked as eyelet buttonholes (simply stretching the stitches to form holes),
rather than creating buttonholes through knitting techniques.
Use 6.60mm needles.
Pick up sts continuously along the edge from the hem of the right front piece up to the hem of the left front piece.
Start by picking up along the right front edge,
from the hem up to the top of the hood.
Insert the needle between the edge stitch and the second stitch from the edge.
Pick up 4 sts, skip 1 row, *pick up 3 sts, skip 1 row* repeat ** 33 more times, pick up 3 sts (109 sts total).
After picking up 109 sts from the hem of the right front piece up to the top of the hood,
place a marker on the needle for clarity.
Next, pick up stitches along the left front edge,
from the top of the hood down to the hem.
*pick up 3 sts, skip 1 row* repeat ** 34 more times, pick up 4 sts (109 sts total).
With 109 sts from the left front edge and 109 sts from the right front edge,
you will have a total of 218 sts picked up.
From Row 2 onward, work in 2x2 rib.
Front Band Row 2
*p2, k2* repeat ** 53 more times, p2 (218 sts total)
Front Band Row 3
*k2, p2* repeat ** 53 more times, k2 (218 sts total)
Front Band Rows 4–8
Repeat Front Band Rows 2 and 3 in 2x2 rib.
After completing Row 8,
bind off in pattern as for the sleeves, working each stitch as it appears.
When the bind-off is complete, cut the yarn leaving a 10 cm tail.
Thread the yarn through the final loop on the needle to secure.
Weaving in Ends
On the wrong side of the fabric,
weave in the yarn tail through several stitches,
splitting the strands slightly so it does not show on the right side.
Then go back one stitch and weave through again to secure.
When finishing areas where yarn was joined,
weave the old yarn tail downward (toward the cast-on edge)
and the new yarn tail upward (toward the bind-off edge).
Cross the two yarns, twist them once to secure,
then weave in each tail in its respective direction using the same method as above.
For any gaps at the join between the body and hood,
insert the needle into the outer half of the stitches around the hole. (Video③ 19:40)
After going all the way around, gently pull the yarn to close the gap.
Weave in the yarn tail on the wrong side of the fabric.
Steam Blocking
Hold the iron slightly above the fabric and apply plenty of steam to the areas
where stitches were picked up or seams were made,
smoothing and shaping the fabric.
Buttons (a backing button is recommended for reinforcement)
Sew the buttons at the indicated positions on the left front band.
Thread sewing thread through a sewing needle,
tie the two ends together so it is doubled,
and knot it twice to make the knot larger than the buttonhole.
Bring the needle up from the back of the button to the front,
then pass it down through the adjacent hole and bring it out to the back again.
Slip the needle through the loop of sewing thread and pull tight to secure.
(If using a backing button, attach the thread to the backing button instead.)
After attaching the thread to the button,
insert the needle through the knitted fabric,
splitting the yarn strands,
and sew the button in place as you would in standard button sewing.
Since the button needs a shank to sit above the fabric,
pull the thread snugly but not too tightly.
After passing the needle through the button 2–3 times,
wrap the thread around the base of the button about 3 times to form a shank.
Insert the needle through the wrapped threads (splitting them),
then bring the needle to the wrong side of the fabric.
Make a knot to secure,
then bring the needle back out at the base of the button.
Pass the needle through the shank 2 more times, splitting the threads,
then bring it again to the wrong side and cut the yarn.
Sew the remaining 4 buttons in the same way.
Buttonholes
Mark the buttonholes by sewing a small marker stitch on the inside of the fabric.
You can add a bead or knot so that the position can be felt easily by touch.
Alternatively, reinforce the buttonholes with blanket stitch,
widening the hole gently as you secure it.
You’ve finished! Great job and well done!
There are quite a few steps since this is a garment,
but even if some parts feel confusing,
try focusing closely on your stitches and working through it.
As you complete the piece while carefully observing your stitches,
many things will start to make sense afterward.
So even if this is your first time making a garment,
don’t worry too much about understanding everything at the beginning—
just aim to finish it and give it a try!
I also share other knitting patterns and tutorials,
so be sure to check out my other posts, as well as my YouTube,
Instagram, and LINE stickers!
Thank you so much for reading until the end! ☻
sts = stitch(es)
k = knit
p = purl
ssk = slip, slip, knit
k2tog = knit 2 stitches together
RLI = right lifted increase
LLI = left lifted increase
Dec = decrease
St st = stockinette stitch
PM = place marker
SM = slip marker
hooded cardigan knitting tutorial