

Tropical Mini Shoulder Bag【Free Pattern】【Video】【Chart PDF】crochet tutorial
Updated: Apr 17
This pattern includes a tutorial video,
and you can scroll down to see the chart!
↓↓↓Here is the PDF file.↓↓↓(You can print it from here)
↑↑↑↑↑↑↑↑↑↑↑↑↑↑↑↑↑↑↑↑


Hello! I'm Kaitlin.
This time,
I crocheted a mini shoulder bag using two strands of Leafy yarn in a beautiful tropical variegated color.
The compact size is super cute,
and the vibrant color changes really stand out!
With a stitch pattern that highlights the variegation
and a twist-lock clasp for the finishing touch,
this bag has a more polished, high-end feel.
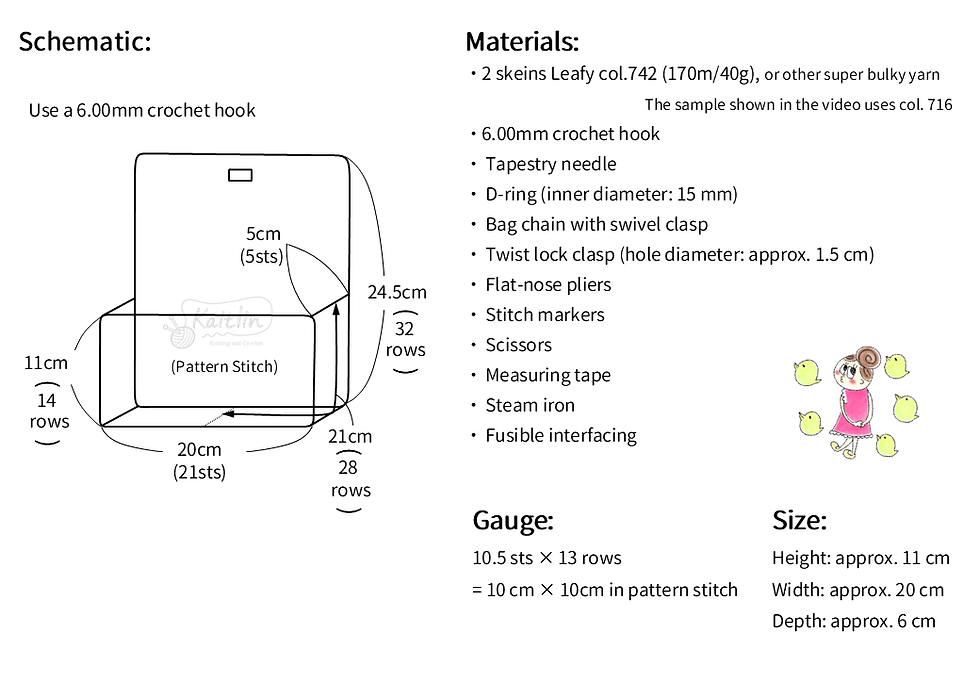
Materials:
・2 skeins Leafy col.742 (170m/40g), or other super bulky yarn The sample shown in the video uses col. 716
・6.00mm crochet hook
・ Tapestry needle
・ D-ring (inner diameter: 15 mm)
・ Bag chain with swivel clasp
・ Twist lock clasp (hole diameter: approx. 1.5 cm)
・ Flat-nose pliers
・ Stitch markers
・ Scissors
・ Measuring tape
・ Steam iron
・ Fusible interfacing
Gauge:
10.5 sts × 13 rows
= 10 cm × 10cm in pattern stitch
Size:
Height: approx. 11 cm
Width: approx. 20 cm
Depth: approx. 6 cm
Front Panel
Hold two strands of Leafy yarn together,
and make a slightly loose foundation chain of 21 stitches.
Row 1
ch 2 as turning chain, 20 hdc2tog, 1 hdc
Work the hdc2tog and final hdc into both the top loop and back bump of each foundation ch stitch.
Row 2
ch 1 as turning chain, turn your work, 21 sl st
For the final slip stitch, insert the hook into the second ch of the turning ch-2 from the previous row,
catching the outer loop and back bump.
Row 3
ch 2 as turning chain, turn your work, 20 hdc2tog, 1 hdc
This time, work the hdc2tog and final hdc into the spaces between the stitches of the previous row.
When working the stitches,
pull the yarn up slightly higher so that the stitch matches the height of the ch-2 turning chain.
Rows 4–13
Repeat Rows 2 and 3
Even-numbered rows follow the same steps as Row 2,
Odd-numbered rows follow the same steps as Row 3.
Row 14
ch 1 as turning chain(Pull the yarn to tighten the stitch), 21 reverse sc.
Once you’ve completed all 21 reverse single crochets,
leave a 15 cm yarn tail,
cut the yarn, and pull it through the final stitch to fasten off.
Back Panel
Work the same as the front panel up to Row 29.
Even-numbered rows follow the same steps as Row 2,
and odd-numbered rows follow the same steps as Row 3.
Row 30
ch 1 as turning chain, turn your work, 9 sl st, ch 2 (loosely), 10 sl st
Row 31
ch 2 as turning chain, turn your work,
9 hdc2tog(For the 9th stitch, insert the hook fully into the ch sp of the prev row.),
2 hdc2tog with a lower height (Insert the hook fully into the ch sp of the prev row.),
9 hdc2tog, 1 hdc
Row 32
ch 1 as turning chain(pull the yarn to tighten the stitch), 21 reverse sc
After finishing all 21 reverse single crochets,
leave a 15 cm yarn tail, cut the yarn,
and pull it through the last stitch to fasten off—just like you did for the front panel.
Side Panel A
Begin crocheting outward from the center of the base,
working both to the left and right.
Start with a slightly loose foundation chain of 5 stitches.
Row 1
ch 2 as turning chain, 4 hdc2tog, 1 hdc
Work the hdc2tog stitches and the final hdc into both the top loop and back bump of each foundation ch.
Row 2
ch 1 as turning chain, turn your work, 5 sl st
For the final sl st, insert the hook into the second chain of the turning ch-2 from the previous row,
catching both the outer loop and the back bump.
Row 3
ch 2 as turning chain, turn your work, 4 hdc2tog, 1 hdc
This time, insert your hook into the spaces between the stitches from the previous row.
Pull up the yarn slightly higher when making each stitch,
so that the height matches the turning ch-2.
Rows 4–27
Repeat the same pattern as in Rows 2 and 3:
Work even-numbered rows as in Row 2,
and odd-numbered rows as in Row 3.
Row 28
ch 1 as turning chain(pull the yarn to tighten the stitch), 5 reverse sc
Once you’ve completed the 5 reverse single crochets,
leave a 15 cm yarn tail, cut the yarn, and pull it through the final stitch to fasten off.
Side Panel B
Pick up stitches from the foundation chain of Side Panel A and crochet in the opposite direction.
Turn the piece upside down,
attach the yarn to the unused bottom loop of the very first foundation chain stitch,
and work Rows 1 through 28 in the same way as before.
(Note: The number of turning chains in Row 1 is different from Side Panel A. (A…ch2, B…ch1))
Changing Yarn
If you need to change yarn midway,
do so on an odd-numbered row.
Begin the hdc2tog stitch as usual but stop before completing it.
Bring the old yarn tail over the hook from front to back,
leave about 15 cm of the new yarn tail on the back side of the work,
then yarn over with the new yarn and pull through all 6 loops on the hook to complete the stitch.
Let both yarn tails rest on the back side of the fabric until you're ready to weave them in.
Steam Blocking
Hold the steam iron above the fabric
and apply plenty of steam evenly across the surface to help shape and smooth the piece.
Assembly
Join the crocheted pieces using reverse single crochet.
Align the front panel and side panel with the right sides facing out.
Refer to the "Joining Guide" diagram,
and begin joining the pieces with reverse single crochet,
starting at the ch-2 turning chain on Row 13 of the front panel. ( 35 sts total.)
Since you are joining along the odd-numbered rows,
work one reverse single crochet per row.
The front panel has more foundation stitches than the side panel has rows,
so refer to the “Joining Guide” diagram and work two reverse single crochets
into the specified odd-numbered rows of the side panel to adjust the stitch count.
For turning chains: split the chain and insert the hook under the two outer loops.
For half double crochets: split the post and insert the hook under the two outer loops.
For the foundation chains on the front panel: insert the hook into the remaining bottom loop.
When finished, leave a yarn tail of about 15 cm, cut the yarn,
and pull it through the final stitch to fasten off.
Repeat the same process to join the back panel and side panel,
again with right sides facing out,
starting from Row 13 of the back panel,
and join using reverse single crochet as before.
Weaving in the Ends
To finish off the yarn tail from the end of the reverse single crochet seam,
weave it in so that it connects seamlessly with the beginning of the adjacent reverse single crochet.
Thread the yarn tail onto a tapestry needle.
Insert the needle from front to back under the two strands coming out of the turning chain
at the beginning of the neighboring reverse single crochet. (Video 25:40)
Next, insert the needle under the four slanted strands at the end of the reverse single crochet row,
and bring the yarn to the back side of the fabric.
On the wrong side,
weave the yarn through a few stitches, making sure it doesn’t show on the front.
Then go one stitch back and make a U-turn,
weaving the yarn in the opposite direction to secure it.
Repeat this process to finish off all remaining yarn ends.
For yarn tails from reverse single crochet seams,
be sure to first connect the starting and ending stitches as described above,
then weave in the tail to finish.
Twist Lock Clasp
Twist Part
Insert the twist lock front piece from the front side of the bag,
positioning it around the center two stitches on Row 5
(counting from the beginning of the front panel),
11 stitches in from both the left and right sides.(Video 26:59)
From the inside of the bag, place the metal washer (back plate) over the prongs of the twist lock,
then use flat-nose pliers to bend the prongs outward to secure it in place.
Lock Hole Part
Attach the locking (hole) part to the flap.
Insert the male part with prongs through the flap from the front side,
then place the washer (female part) over the prongs from the back side.
Use flat-nose pliers to gently bend the prongs outward to temporarily hold the piece in place.
Make sure that no stitches enter the open hole of the clasp,
and adjust the fabric if needed.
To avoid scratching the front side of the clasp,
cover it with a piece of felt or cloth,
then use the pliers to firmly press the prongs down and secure the piece.
D-Ring
Thread a single strand of yarn onto a tapestry needle.
Sew the D-ring in place by passing the needle through the stitches of the last row of the side panel,
splitting the stitches but not splitting the yarn itself. (Video 28:36)
Weave the yarn tail into the back side of the fabric a few times to secure it,
then stitch over the D-ring to attach it firmly to the fabric.
Once finished,
weave in the ending yarn tail on the wrong side of the fabric,
just as you did with the starting tail.
Fusible Interfacing (Video 29:50)
Adding fusible interfacing is optional.For this project,
I used a triple-layer structure: knit interfacing → non-woven interfacing → knit interfacing.
Cut the interfacing according to the finished dimensions of your bag.
Leave a bit of extra width,
and keep the height just right to ensure a clean finish.
Turn the bag inside out,
and lightly press the ends of the first knit interfacing layer with an iron to hold it in place.
Check the balance and carefully fuse the interfacing to the fabric.
※ Be sure to check which side of the interfacing has the adhesive!
(If you get it wrong... it’s a disaster. You might cry! 😢)
Cut the non-woven interfacing slightly shorter in length
so it can be hidden between the two knit interfacing layers.
Once all three layers are fused in place,
turn the bag right side out.Attach the swivel clasp of the chain to the D-ring.
All done—great job!
You can wear it as a crossbody,or remove the chain and use it as a clutch or pouch,
so it’s a perfect companion for summer outings.
I also share other crochet patterns on this blog,
so feel free to check out my other posts,
YouTube channel, Instagram, and LINE stickers!
Thank you so much for reading to the end! ☻
st(s) = stitch(es)
ch = chain
sc = single crochet
sl st = slip stitch
hdc = half double crochet
hdc2tog = half double crochet 2 stitches together
prev = previous
sp = space
crochet tutorial