

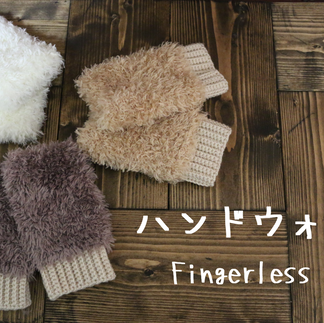
Faux Fur Fingerless Gloves【Video】【Chart PDF】crochet tutorial
- Jul 24, 2025
- 6 min read
This pattern includes a tutorial video,
and you can scroll down to see the chart!


↓↓↓Here is the PDF file.↓↓↓(You can print it from here)


Hello! I'm Kaitlin.
This time, I'm introducing a pair of hand warmers.
Just like the shoulder bag from the previous project,
you'll crochet the main body first,
then add the faux fur yarn afterward.
This makes it easy to work with,
and gives the finished piece great warmth and comfort!
They also add a cute accent peeking out from your sleeves.
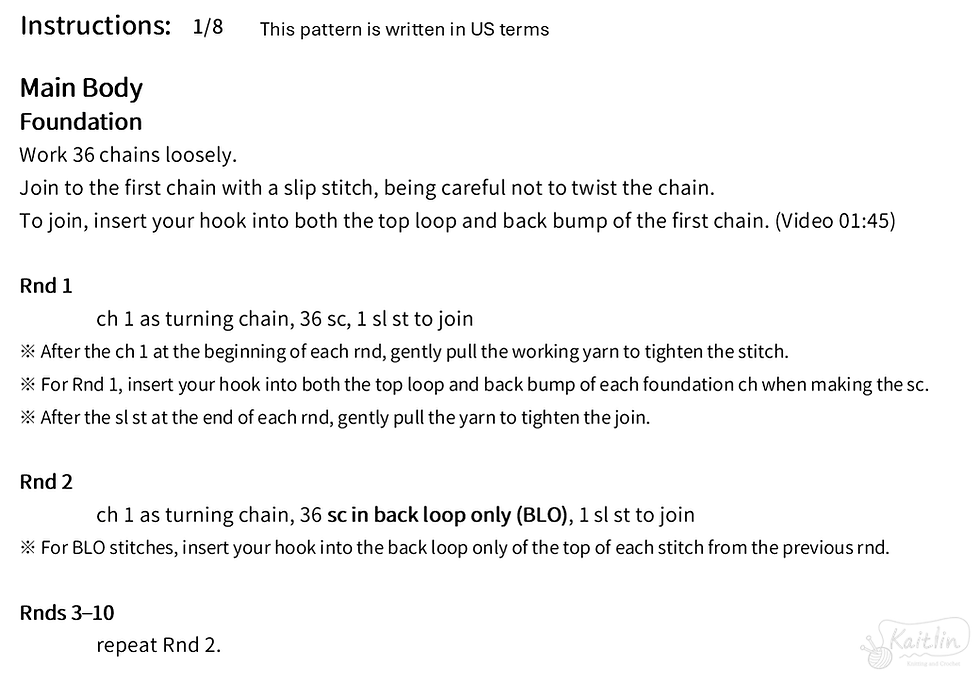
Main Body
Foundation
Work 36 chains loosely.
Join to the first chain with a slip stitch,
being careful not to twist the chain.
To join, insert your hook into both the top loop
and back bump of the first chain. (Video 01:45)
Rnd 1
ch 1 as turning chain, 36 sc, 1 sl st to join
※ After the ch 1 at the beginning of each rnd, pull the working yarn to tighten the stitch.
※ For Rnd 1, insert your hook into both the top loop and back bump of each foundation ch when making the sc.
※ After the sl st at the end of each rnd, pull the yarn to tighten the join.
Rnd 2
ch 1 as turning chain, 36 sc in back loop only (BLO), 1 sl st to join
※ For BLO stitches, insert your hook into the back loop only of the top of each stitch from the previous rnd.
Rnds 3–10
repeat Rnd 2.
Rnd 11
ch 1 as turning chain, 1 BLO sc, ch 4 (loosely), 31 BLO sc, 1 sl st to join
Rnd 12
ch 1 as turning chain, 1 BLO sc, 4 sc, 31 BLO sc, 1 sl st to join
※ For the 4 sc, insert your hook through both the top loop and back bump of the ch from the prev rnd (split the ch).
Rnds 13–19
repeat the instructions for Rnd 2.
Rnd 20
ch 1 as turning chain, 36 BLO sc
After completing the last BLO sc, leave a tail of about 10 cm, cut the yarn,
and simply pull the end through the final stitch.
Note: Depending on your tension when adding the faux fur,
the glove may feel slightly loose at this point—
but that’s just right. It should fit comfortably when your hand is inserted after finishing.
Changing Yarn (Video 06:01)
While the BLO sc is still incomplete,
bring the old yarn tail over the hook from front to back.
Place the new yarn behind the work, leaving a 10 cm tail.
Yarn over with the new yarn and pull through all 3 loops on the hook.
For the next few stitches,
hold both yarn tails on top of the row and crochet over them to secure.
Weaving in Ends (Video 10:02)
Thread the ending yarn tail onto a tapestry needle.
Insert the needle from front to back under the top two loops of the first stitch of the final round.
Then insert the needle into the center of the last stitch (where the yarn tail is coming from)
and pull through—this creates an invisible finish.
Turn the work over,
and weave the yarn tail through the back side of the stitches,
making sure it doesn’t show on the front.
Go one stitch backward and pass the needle through again to secure the tail.
Use the same method to weave in the starting yarn tail on the wrong side of the fabric.
Ribbing
Make a foundation chain of 8 chains.
Work the 1st and 8th chains tightly, and the remaining chains loosely.
Row 1
ch 1 as turning chain, 8 sc
※ After the ch 1 at the beginning of each row, pull the working yarn to tighten the stitch.
※ For this row, insert your hook into both the top loop and the back bump of each chain.
Row 2
ch 1 as turning chain, turn your work, 1 sc, 6 BLO sc, 1 sc
※ For BLO stitches, insert your hook into the back loop only (the far loop) of the stitch.
Rows 3–36
repeat Row 2.
Note:Work all BLO stitches into the far loop (back loop),
regardless of the direction you are crocheting. This creates a ribbed texture.
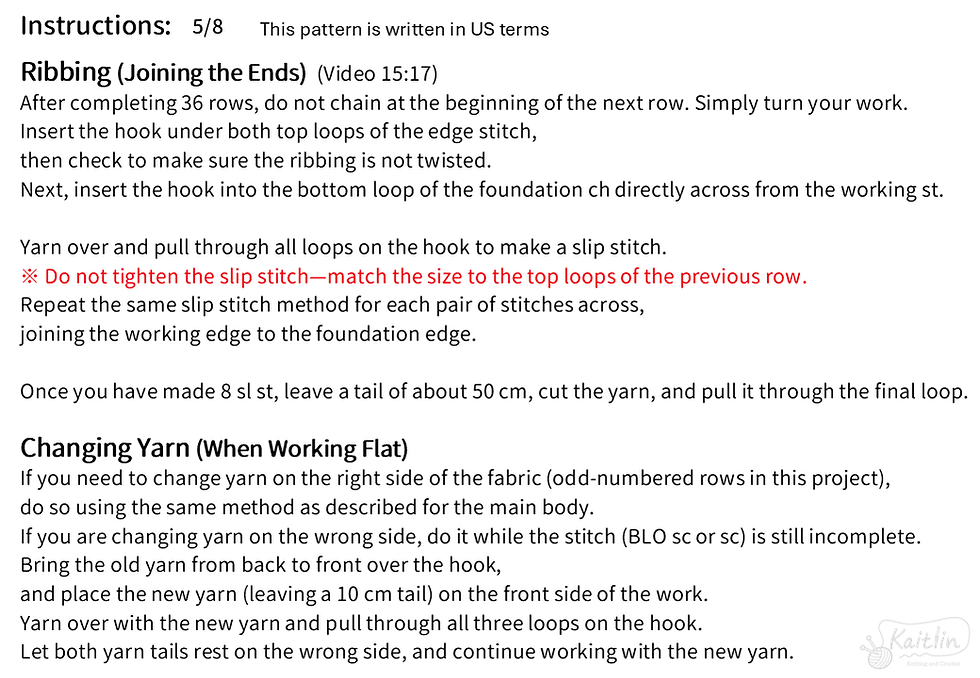
Ribbing (Joining the Ends) (Video 15:17)
After completing 36 rows,
do not chain at the beginning of the next row. Simply turn your work.
Insert the hook under both top loops of the edge stitch,
then check to make sure the ribbing is not twisted.Next,
insert the hook into the bottom loop of the foundation ch directly across from the working st.
Yarn over and pull through all loops on the hook to make a slip stitch.
※ Do not tighten the slip stitch—match the size to the top loops of the previous row.
Repeat the same slip stitch method for each pair of stitches across,
joining the working edge to the foundation edge.
Once you have made 8 sl st, leave a tail of about 50 cm,
cut the yarn, and pull it through the final loop.
Changing Yarn (When Working Flat)
If you need to change yarn on the right side of the fabric (odd-numbered rows in this project),
do so using the same method as described for the main body.
If you are changing yarn on the wrong side,
do it while the stitch (BLO sc or sc) is still incomplete.
Bring the old yarn from back to front over the hook,
and place the new yarn (leaving a 10 cm tail) on the front side of the work.
Yarn over with the new yarn and pull through all three loops on the hook.
Let both yarn tails rest on the wrong side, and continue working with the new yarn.
Joining the Main Body and Ribbing (Video 16:49)
Thread the yarn tail onto a tapestry needle.
Insert the needle through the 1st and 2nd sts of the foundation ch of the main body. (Video 17:00)
Next, insert the needle through the edge stitches of Rows 36 and 35 of the ribbing. (Video 17:14)
Then, insert the needle through the 3rd and 4th stitches of the main body’s foundation chain,
followed by the edge stitches of Rows 34 and 33 of the ribbing.
Continue this process,
moving to the next pair of stitches and rows each time,
alternating between the main body and ribbing.
This will neatly seam the two pieces together.
To finish,
pass the needle through the last and first stitches of the main body,
then through the foundation edge of the ribbing.
Turn the work to the wrong side,
and weave in the yarn tail through the back of the fabric.
Make a small U-turn (going back one stitch),
and pass the needle through again to secure the tail.
Make a second piece in the same way.
Faux Fur
Start attaching the faux fur yarn from the first stitch of the foundation chain on the main body.
Insert your hook from underneath into the unused bottom loop of the first chain,
yarn over and pull up a loop. (Video 19:23)
Yarn over again and pull through the loop on the hook to attach the new yarn.
Insert the hook into the same stitch and make a single crochet.
Then, insert the hook into the second chain stitch,
and make another single crochet.
Continue working one single crochet into each bottom loop of the foundation chain,
all the way around.
Once you reach the last stitch of the foundation chain,
insert your hook from underneath into the front loop of the first BLO sc of Round 1,
and work a single crochet. (Video 20:32)
Make a single crochet into the second stitch of Round 1, just as before.
Repeat this process.
Faux Fur
For the thumb opening, do the following:
On the bottom side of the hole,
work 4 single crochets into the full top loops (both loops)
of the BLO stitches from the main body. (Video 21:00)
On the top side of the hole,
work 4 single crochets into the unused bottom loops
of the chain stitches. (Video 21:31)
For the final round,
work single crochets into the top two loops of each stitch.
When you reach the last stitch of the final round,
insert the hook into the first stitch of the final round on the main body and make a slip stitch.
(Note: It's okay to estimate the spot, as the fur will hide the exact stitch.)
Then, chain 1, leave a 10 cm tail, cut the yarn,
and pull it through the final chain.
Weave in the yarn tail using the same method as for the main body.
Repeat the faux fur for the second piece as well.
All done—great job!
This project is super quick and easy to make,
so it’s perfect for gifts too!
You could even make a few in different colors to match your outfits.
I also share other knitting and crochet patterns,
so feel free to check out my other blog posts,
YouTube channel, Instagram, and LINE stickers!
Thank you so much for reading to the end! ☻
crochet tutorial