

Plaid Crochet Bag with Faux Fur 【Video】【Chart PDF】【Free Pattern】 Crochet tutorial
- Aug 22, 2025
- 10 min read
Updated: Apr 9
This pattern includes a tutorial video,
and you can scroll down to see the chart!


↓↓↓Here is the PDF file.↓↓↓(You can print it from here)
↑↑↑↑↑↑↑↑↑↑↑↑↑↑↑↑↑↑↑↑↑↑↑↑


Hello, this is Kaitlin!
This time, I used the planned pooling technique to crochet this plaid bag.
By working variegated yarn in a consistent stitch sequence,
you can create a plaid pattern without having to change colors.
The faux fur edging is attached with slip stitches into the back loops,
so there’s no worry about dropping stitches.
Another highlight is the diagonal lattice design on the sides,
which matches beautifully with the plaid motif.
It’s a project where you just crochet straight rows,
yet it turns out super cute—definitely give it a try!
Setup Round
Work single crochets into the bag base. (This is the setup round.)
Start from the third hole upward from the outermost point on the right side of the bag base. (See the Chart: starting point.)
Use two strands of solid-colored Korpokkur yarn and a 3.50mm crochet hook.
Insert your hook from the right side of the bag base into the hole and attach the yarn. (Video at 01:20)
Make 2 single crochets into the same hole where the yarn was attached.
Then make 2 single crochets into the next hole.
Repeat this process—working 2 single crochets into each hole—until you reach the end.
When you’ve worked 84 single crochets into the 42 holes of the bag base,
cut the yarn leaving a 15 cm tail. Pull the yarn tail all the way through the final stitch.
Thread the yarn tail onto a tapestry needle
and use the invisible join method to neatly connect the first and last sts.
Place a stitch marker on both top loops of the very first single crochet.
Insert the needle from front to back under these two marked loops.
Then, insert the needle back through the point where the final yarn tail comes out,
mimicking the path of a regular st.
This creates a clean and seamless join. ( = chain join)
To weave in the tail,
work the needle under a few stitches on the wrong side of the fabric,
then go one stitch back and weave again to secure it.
Planned Pooling
For this project,
we'll be working with a single strand of Korpokkur Multi-Color col.107 using a 2.30mm crochet hook.
The color sequence of col.107 is as follows:
Brown 1 → Pink → Brown 2 → Orange 1 → Lime 1 → Beige → Lime 2 → Orange 2
This sequence repeats throughout the yarn.
Since the dyed lengths of each color vary,
you’ll need to adjust your tension as you crochet.
For this sample, we’ll begin with Brown 1.
(You can start with any color, but please note that the appearance of the plaid will vary depending on your starting point.
If you’re new to planned pooling, starting with the same color shown here is recommended.)
From the marked stitch in the setup round you made earlier,
count 31 sts and place another marker in the 31st stitch.
Insert your hook into the first marked stitch and attach the yarn,
leaving a tail of at least 10 cm.
Make sure to begin with the Brown 1 section on your hook.
Row 1
ch 1 as turning chain, *1 sc, ch 1* repeat ** 29 more times, 1 sc (61 stitches total)
Follow the Color Pooling Chart to match the yarn colors as you go.
At the end of this round, 31 of the 84 single crochets from the setup round will now have stitches worked into them.
Row 2
ch 1 as turning chain, turn your work,
1 sc, *1 sc, ch 1* repeat ** 28 more times, 2 sc (61 stitches total)
Again, refer to the Color Pooling Chart to match colors as you work.
Row 3
ch 1 as turning chain, turn your work,
*1 sc, ch 1* repeat ** 29 more times, 1 sc (61 stitches total)
Follow the Color Pooling Chart to match the yarn colors as you go.
Rows 4 – 58
Repeat the same process as in Rows 2 and 3.
For even-numbered rows, follow the instructions from Row 2.
For odd-numbered rows, follow the instructions from Row 3.
Once you've completed the last stitch of Row 58,
chain 1, leave a yarn tail of about 10 cm,
cut the yarn, and pull the tail through the final chain to fasten off.
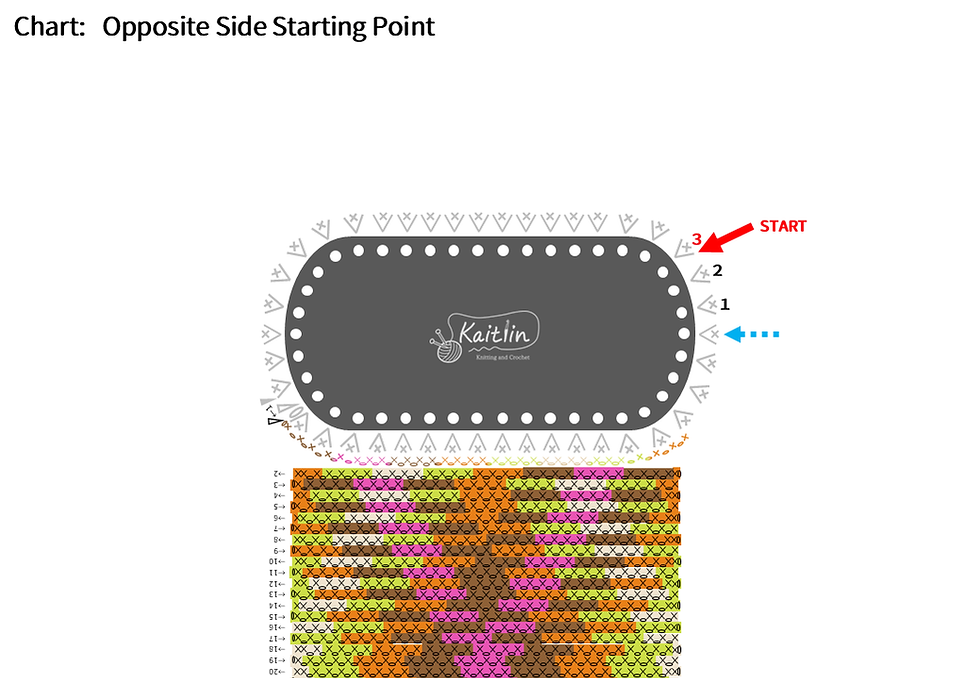
Work the opposite side of the bag in the same way. (Refer to the Chart: Opposite Side Starting Point.)
Changing Yarn
When changing yarn—
make sure to switch colors at the same point in the color pattern to maintain the planned pooling effect.
If you're changing yarn on the right side of the fabric, do the following:
While the single crochet is still incomplete,
bring the old yarn tail over the hook from front to back.
Place the new yarn behind the work.
Find the matching point in the color sequence and yarn over with the new yarn.
Pull through all 3 loops on the hook to complete the stitch.
Gently pull the new yarn tail to adjust the color placement,
then continue crocheting.
After working a few stitches and once the fabric is stable,
lightly tie the two yarn ends together to hold them in place (you’ll untie this temporary knot when weaving in the ends later).
When changing yarn on the wrong side of the fabric,
do it while the single crochet is still incomplete.
Bring the old yarn from back to front over the hook,
Place the new yarn tail in front of the fabric,
and yarn over with the new yarn at the point where the color pattern continues seamlessly.
Pull through all 3 loops on the hook to complete the stitch.
After working a few stitches and once the fabric is stable,
lightly tie the two yarn tails together where the change occurred.
Side Panels
We will now crochet the side panel using a textured stitch pattern.
Use a single strand of solid-colored Korpokkur yarn and a 2.30mm crochet hook.
Pick up stitches from the side 13 sts of the sc round you made at the base of the bag during the setup round.(Refer to the Chart: Side Panel Starting Point.)
The first stitch corresponds to the last stitch of the planned pooling section.
The 13th stitch corresponds to the first stitch of the planned pooling section.
Side – Row 1
Attach the yarn, ch 1, *2 sc into the same stitch* repeat ** once more,
*3 sc into the same st, 2 sc into the same st* repeat ** 4 more times,
2 sc into the same st (31 stitches total)
Side – Row 2
ch 3 as turning chain, turn your work, 30 dc
(31 stitches total, counting the beginning ch 3 as the first dc)
Side – Row 3
ch 1 as turning chain, pull the yarn to tighten the ch, turn your work, 3 sc,
*Place a marker two stitches ahead, 1 fpdc2tog (Video ② 04:58),
3 sc starting from the marked stitch* repeat ** 6 more times. (31 stitches total)
For the last sc of the row, Insert your hook into the 3rd chain of the turning chain from the previous row,
catching both the outer loop and the back bump.
Side – Row 4
Repeat the same steps as Row 2.
Side – Row 5
ch 1 as turning chain, pull the yarn to tighten the ch, turn your work, 1 sc,
place a marker two stitches ahead, 1 fpdc, 3 sc starting from the marked stitch.
*place a marker two stitches ahead, 1 fpdc2tog (Video ② 13:04),
3 sc starting from the marked stitch* repeat ** 5 more times,
1 fpdc, 1 sc. (31 stitches total)
For the last sc of the row, Insert your hook into the 3rd chain of the turning chain from the previous row,
catching both the outer loop and the back bump.
Side – Row 6
Repeat the same steps as Row 2.
Side – Row 7
ch 1 as turning chain, pull the yarn to tighten the ch, turn your work, 3 sc,
*place a marker two stitches ahead, 1 fpdc2tog,
3 sc starting from the marked stitch* repeat ** 6 more times. (31 stitches total)
For the last sc of the row, Insert your hook into the 3rd chain of the turning chain from the previous row,
catching both the outer loop and the back bump.
Side – Rows 8 – 35
Repeat the same pattern as in Rows 4 – 7.
Once you have completed a total of 35 rows (about 18 cm in height),
ch 1 and fasten off, leaving a yarn tail that is approximately four times the height of the panel.
Cut the yarn and pull the tail through the last chain.
Work the opposite side in the same way:
pick up 13 stitches and crochet 35 rows using the same stitch pattern.
Finish off as described above.
Weaving in Ends
If you changed yarn during the project,
weave in the ends at those points.
Untie any temporary knots you made,
then thread the yarn tail onto a tapestry needle.
On the wrong side of the fabric, weave the needle through several stitches,
then go back one stitch and weave again to secure the end.
This will help keep the front side clean and tidy.
Steam Blocking
Hold a steam iron just above the surface of the fabric and apply plenty of steam.
Gently stretch and shape all four sections of the piece to even out the stitches.
Assembly
Sew the adjacent panels together.
Place the panels right sides facing each other, align the edges,
and clip them together at the ends, center, and midpoint between the two.
Thread the long yarn tail (the one you left earlier) onto a sharp-pointed tapestry needle.
Sew from the opening down to the bottom using a split backstitch,
working through the edge stitches.
After sewing all the way down to the bottom,
weave in the yarn tail by passing the needle through the seam allowance,
then go back one stitch and pass the needle through again to secure it without showing on the front side.
Repeat the same process for the remaining three sections.
Place the adjacent panels with right sides facing each other,
secure the edges with clips,
and sew them together using a backstitch.
If there’s no yarn tail left at a seam, attach new yarn to continue sewing.
Once all four sides are sewn,
steam the seam allowances to smooth and shape the piece.
Weave in all remaining yarn ends.
Edging
Use a 3.50mm crochet hook and work with two strands held together.
Start with two strands of the multicolor yarn,
and crochet as much as you can with it.
(Since the amount of yarn is tight, use the multicolor yarn for the edging as much as possible.)
(This part will later be hidden by the faux fur, so you can substitute with another yarn of similar thickness if needed.)
Edging – Rnd 1
Attach the yarn to the first stitch of the planned pooling section, ch 1 as turning chain, 2 sc, *1 sc in the chain space* repeat ** 28 more times, 2 sc. (33 stitches total)
Continue directly by picking up stitches along the textured side panel:
1 sc into the first stitch of the textured panel,
*1 sc in every second stitch* repeat ** 14 more times. (16 stitches total)
Continue by picking up 33 stitches along the edge of the planned pooling section,
just as you did before, and work single crochets into each.
Then, pick up 16 stitches along the edge of the textured side panel in the same way and work single crochets.
At this point, you will have completed one full round around the bag opening,
with a total of 98 single crochets.
To finish the round,
slip stitch into the first stitch and pull the yarn tight to secure.
Edging – Rnd 2
ch 1 as turning chain, pull the yarn to tighten the ch, 98 sc BLO,
1 sl st to join, and pull the yarn tight. (98 stitches total)
If the multicolor yarn runs out during this section,
switch to two strands of solid-colored Korpokkur and continue in the same way.
Edging – Rnds 3 – 7
Repeat the same steps as in Round 2.
After completing the final sc BLO stitch of Round 7,
leave a yarn tail of about 10 cm,
cut the yarn, and pull the tail through the last sc BLO to fasten off.
Thread the yarn tail onto a tapestry needle
and use the invisible join (chain join) to seamlessly connect the beginning and end of the round:
Insert the needle from front to back under both top loops of the first stitch of the final round.
Then insert the needle back into the point where the last yarn came out,
pulling it to the wrong side of the fabric.
Weave in both the starting and ending yarn tails on the WS,
making sure the finishing is invisible from the front.
Faux Fur
Attach the faux fur yarn by sl st into the unused front loops of the back loop single crochets you previously made.
Use a 3.50mm crochet hook for this section.
Insert your hook into the front loop of the first stitch from Edging Round 1,
yarn over and pull up a loop.
Yarn over again and pull through the loop on the hook. (See Video ③ 12:11)
Move to the next stitch and make a slip stitch.
Continue working slip stitches into the remaining front loops of that round.
If your sl st are too tight, the fabric may pucker or shrink,
so be sure to keep your tension relaxed as you work.
Once you reach the last stitch of the round,
continue directly into the first stitch of the Round 2,
working into the front loop only as before.
Repeat this process for each round,
always crocheting into the front loop only of the previously unworked stitches.
In the final round (Round 7), continue the same way:
slip stitch into the front loop only of each stitch.
After completing the last stitch of Round 7,
chain 1, leave a yarn tail of about 10 cm,
cut the yarn, and pull it through the last chain to fasten off.
Weave in the yarn tail on the wrong side of the fabric,
making sure it doesn’t show on the front.
Finally, use a tapestry needle or your fingers to gently pull out
and fluff up any fur fibers that may have been caught inside the stitches during crocheting.
Handles
First, use stitch markers to mark where the handles will be attached.
Place a marker on the center stitch of the 33 stitches picked up from the planned pooling section. (Video③ 14:55)
From that center marker, count 9 stitches to the right and left,
and place a marker in each of those stitches.
Using whipstitch, sew the rectangular rings onto the 4 stitches from the 10th to the 13th
(next to the marked stitch on each side).
Make sure to sew securely.
Weave in the yarn tails on the wrong side of the fabric,
taking care that they don’t show through to the front.
Repeat the same process on the opposite side of the bag—
mark the handle position with markers and sew on the rectangular rings.
Once all four rectangular rings are attached, you can fasten the handles in place.
st(s) = stitch(es)
ch = chain
sl st = slip stitch
rnd(s) = round(s)
sc = single crochet
sc BLO = single crochet in the back loop only
dc = double crochet
fpdc = front post double crochet
fpdc2tog = front post double crochet 2 stitches together
WS = wrong side
prev = previous
All finished—great work!
The pattern comes together just by crocheting straight rows,
and the result is super cute. I hope you’ll give it a try!
I also share many other crochet patterns,
so feel free to check out my other posts,
as well as my YouTube channel, Instagram, and LINE stickers.
Thank you so much for reading to the end! ☻
crochet tutorial